Keragon
Connect Kickcall & Automate Phone Calls
Written By Maruf Ansari
Last updated About 2 months ago
The Keragon integration connects your Kickcall account with Keragon so you can bring AI-powered phone calls into your healthcare automation workflows. Once connected, you can trigger outbound calls from a Keragon workflow, pass patient or lead information into your Kickcall AI agent, and pull call details back to decide what happens next - all inside Keragon's HIPAA-compliant environment.
What you can build: patient intake follow-up, appointment reminders and confirmations, lead qualification, insurance verification hand-offs, post-visit check-ins, no-show recovery calls and any other workflow-based phone automation across your connected EHR, CRM or intake tools.
Step 1: Connect Kickcall to Keragon
Before you build a phone call workflow, connect your Kickcall account to Keragon. You need an active Kickcall account and a Kickcall API key.
Get your Kickcall API key
Log in to your Kickcall dashboard.
Go to API Keys in the left sidebar.
Create a new key, or copy an existing one.
Store the key securely - you will need it during the Keragon connection.
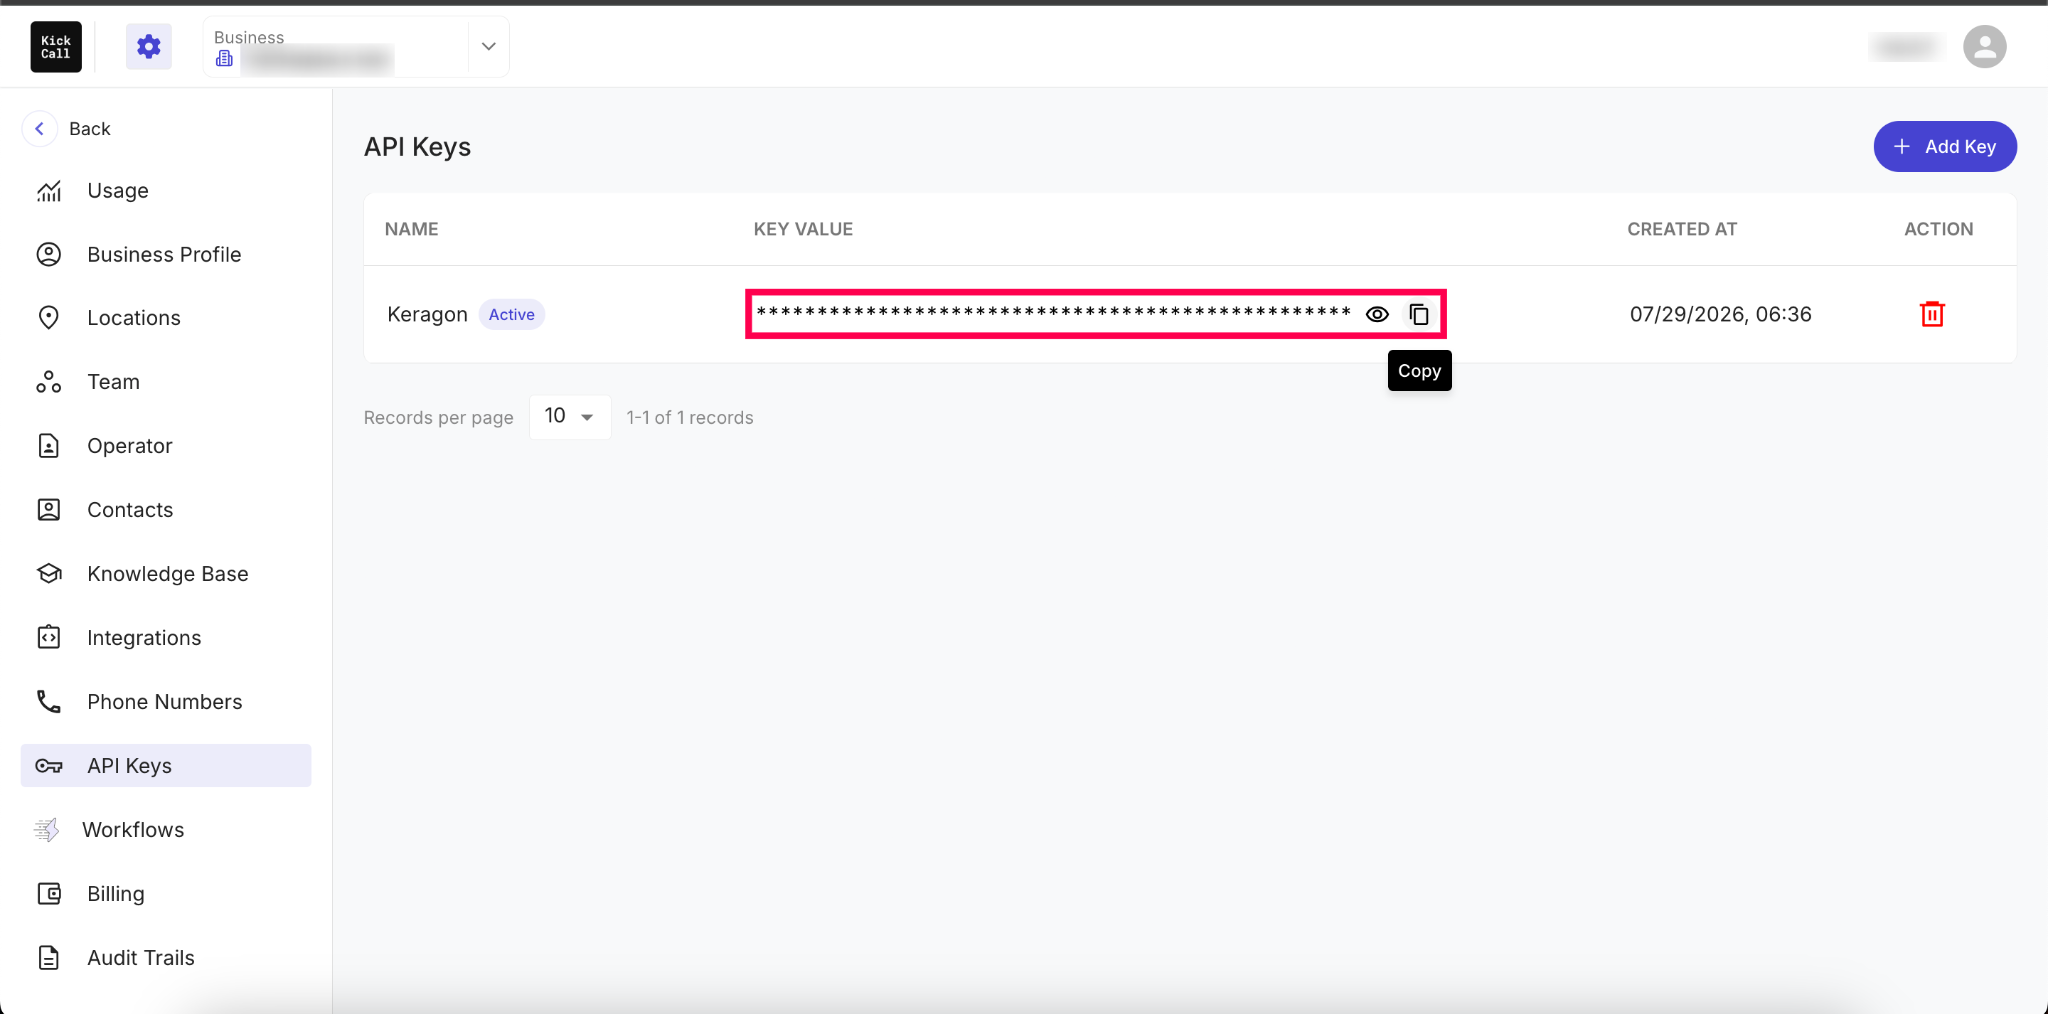
Important: Treat your API key like a password. Never share it publicly or include it in screenshots, shared workflows or documentation.
Install Kickcall AI in Keragon
Open the Keragon workflow builder and open (or create) the workflow you want to add Kickcall to.
Click the + icon to add a new step.
Search for Kickcall AI in the module picker.
Select the action you want to configure first - Create Phone Call or Get Call.
When prompted to connect an account, choose Add new connection.
Enter your Kickcall connection details: the API key and the email address associated with your Kickcall account.
Complete the authentication step to save the connection.
Once the connection succeeds, Kickcall actions become available inside Keragon workflows and can be reused across any workflow in the same Keragon workspace.
Step 2: Create a phone call workflow
Create a Keragon workflow that will trigger the outbound call. Common triggers include:
A new patient intake form is submitted (Jotform, Google Forms, Typeform and similar)
A new lead or contact is created in your CRM
An appointment is created, or its status changes, in your EHR
A patient is tagged for follow-up, a missed appointment or an elevated intake score, for example
A record enters a specific stage or pipeline in a connected tool
A webhook is received from any system Keragon supports
A simple workflow looks like this: New Intake Form Submitted → Create Phone Call → Check Call Status → Update Patient Record.
Tip: Any Keragon trigger that makes sense for your practice will work. Kickcall is designed to sit inside your existing intake, scheduling and CRM automations - including HIPAA-sensitive ones, since the call only needs the fields you choose to map.
Step 3: Configure the Create Phone Call module
Open your workflow.
Click the + icon after your trigger, or after a condition or filter node.
Search for Kickcall and select Create Phone Call.
Fill in the required fields, add optional fields if needed, and save the module.
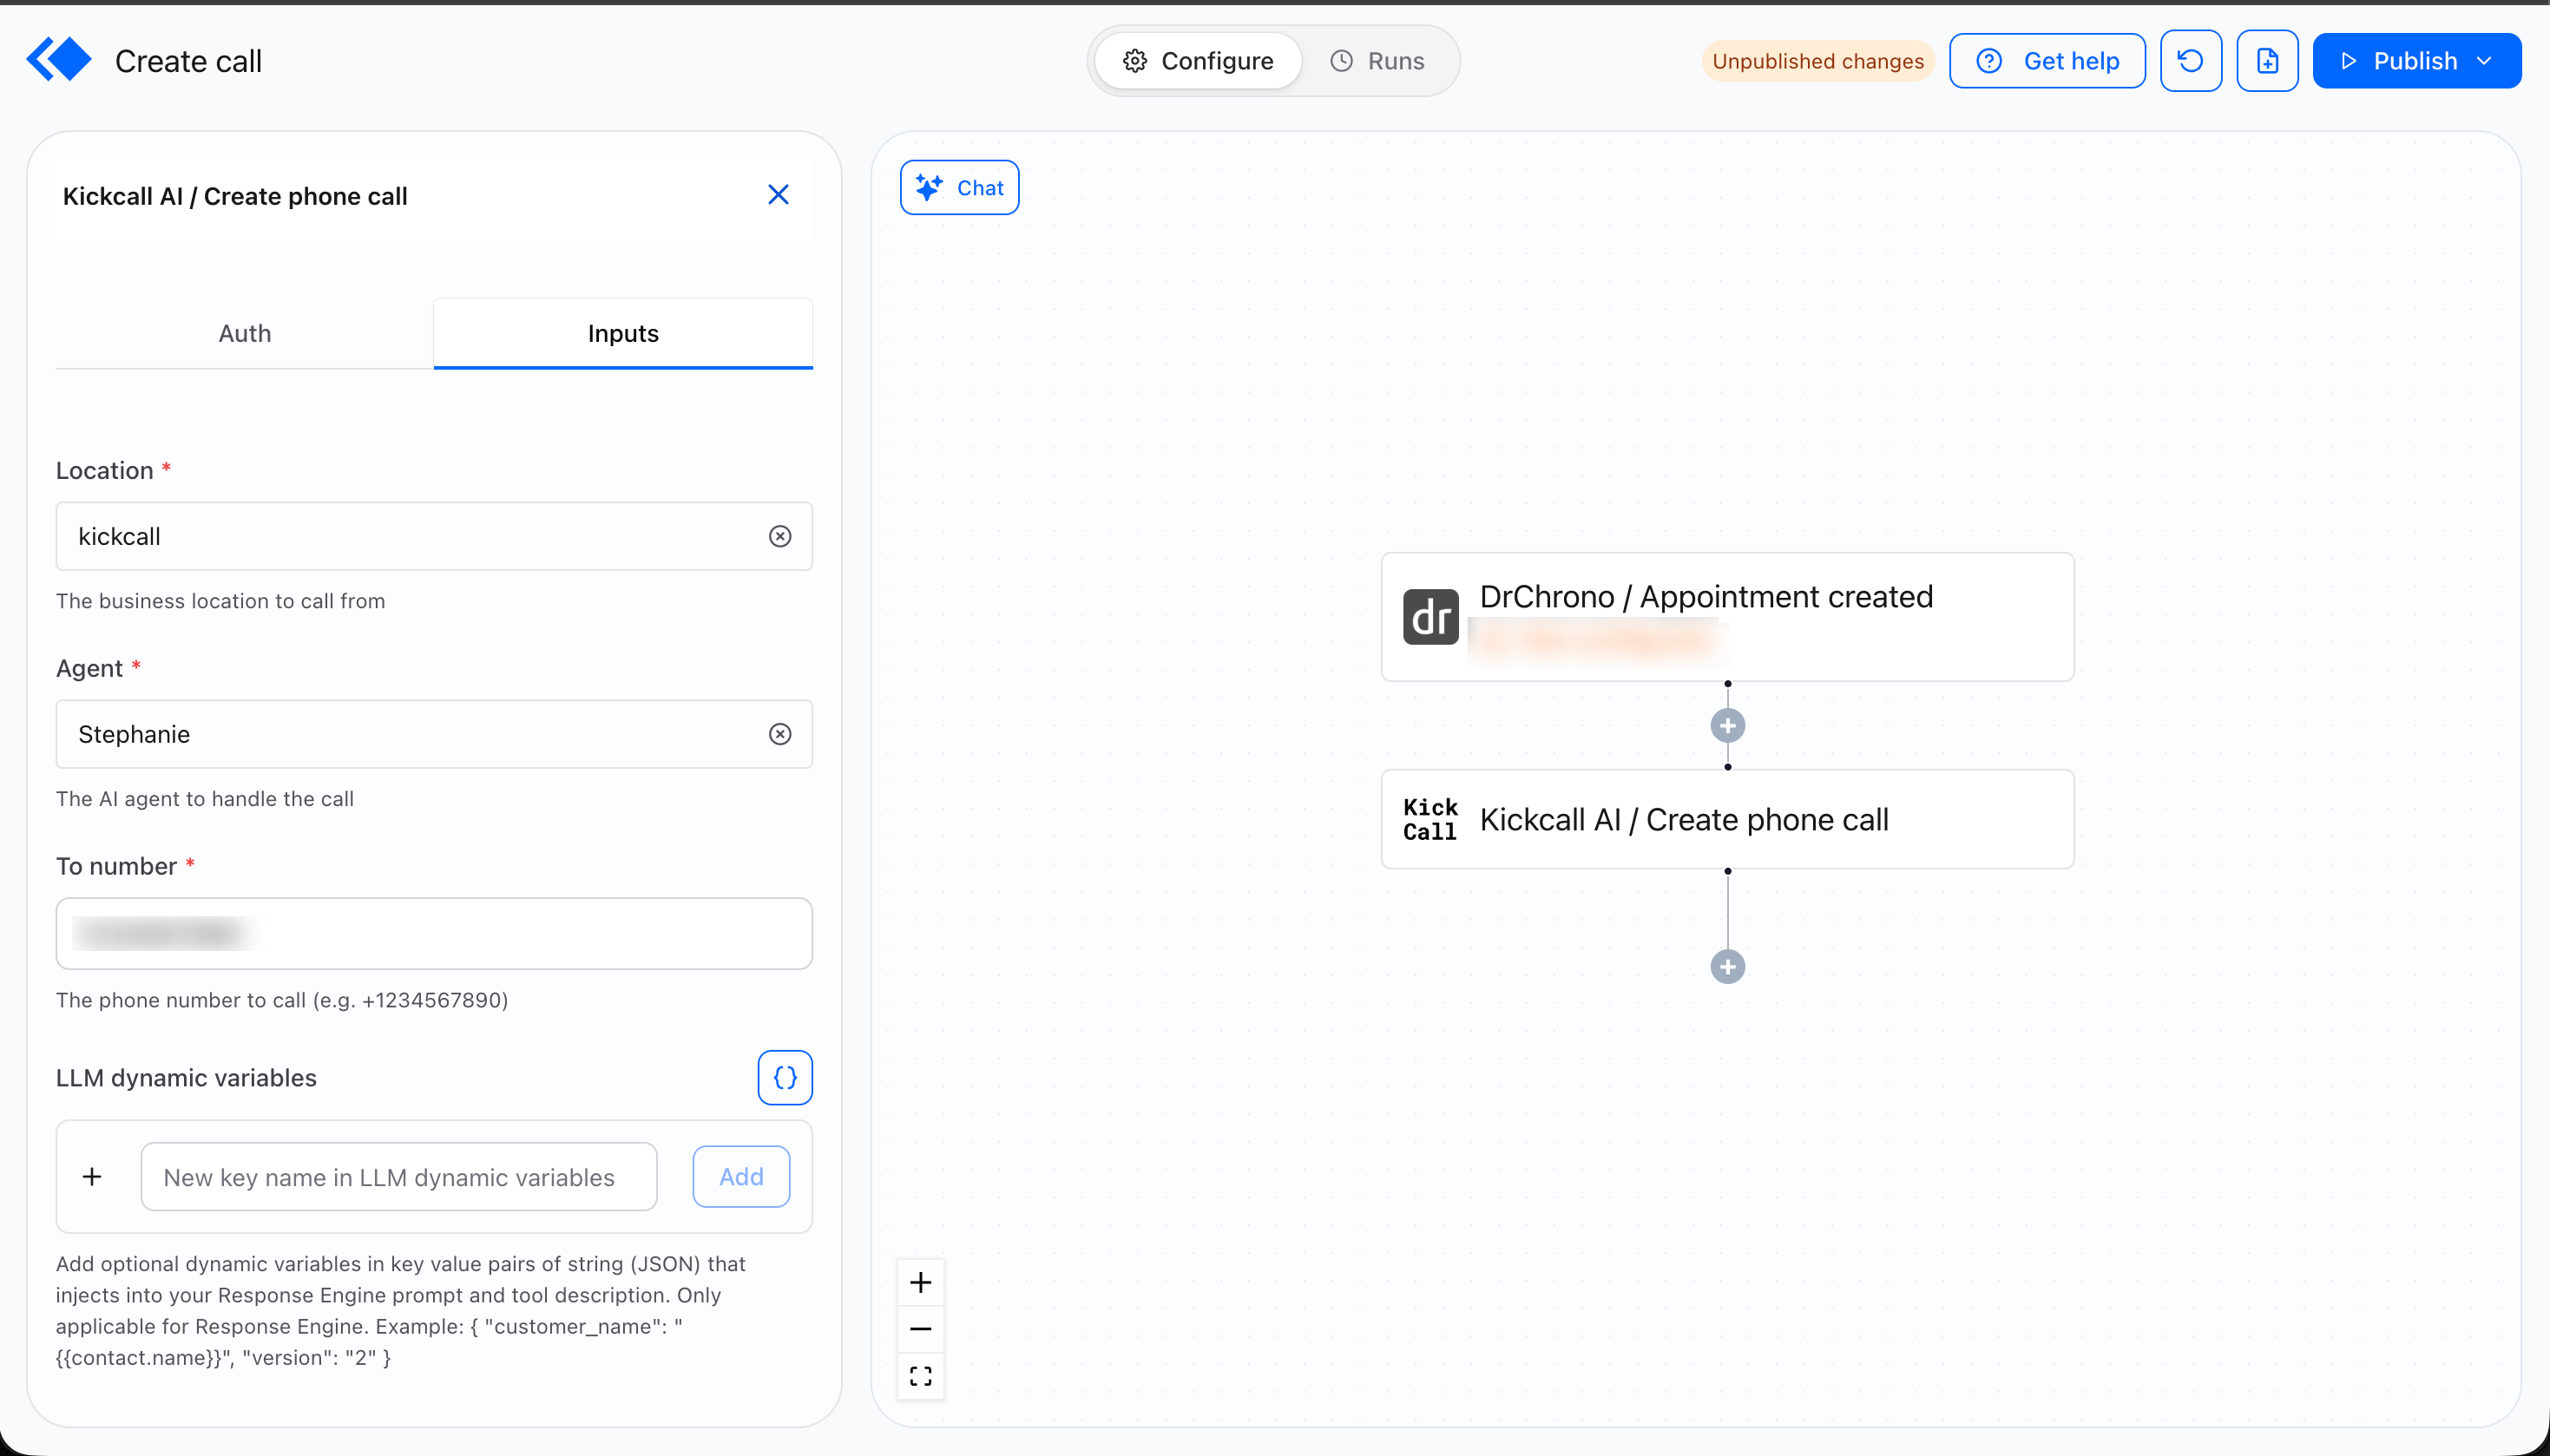
Required fields
Location - the Kickcall business location the call is created from. This is a dynamic dropdown that fetches the locations available in your Kickcall account, so you simply pick one from the list.
Agent - the Kickcall AI agent that will handle the outbound call. Once you select a Location, this dropdown populates with the active agents for that location.
To Number - the phone number Kickcall should call. Map this from your trigger data, for example
{{trigger.phone}}or the patient's phone number from your EHR trigger.
Important: Before mapping a field into To Number, confirm the source field already includes the country code and is formatted in E.164 - for example +12345678900. If your form or EHR only captures a local 10-digit number, add a Format Text or Function module before Create Phone Call to prepend the country code and strip spaces, dashes and parentheses.
Optional - LLM Dynamic Variables
Use Kickcall LLM Dynamic Variables to pass information from Keragon into the AI agent - patient name, appointment time, reason for visit or anything else the agent should know before it speaks. Variables are supplied as JSON, so keep the syntax valid and only send the fields your workflow genuinely needs. This field applies to the Response Engine only.
{
"customer_name": "{{trigger.full_name}}",
"appointment_time": "{{trigger.appointment_time}}",
"reason_for_visit": "{{trigger.reason}}"
}
Step 4: Store the Interaction ID
When Create Phone Call runs successfully, Kickcall returns details about the new call, including the Interaction ID - the unique identifier for that call.
{ "meta": { "message": "Call queued" }, "data": { "interaction_id": 21204, "status": "queued" } }Save it against the record it relates to, so you have a reusable reference later:
If your connected EHR or CRM supports custom fields, create one - for example Kickcall Last Interaction ID.
Add an Update Record module (or the equivalent) after Create Phone Call.
Map the returned
interaction_idinto that field.
A typical pattern is: Create Phone Call → Condition (if status = queued) → Update Record → store the Interaction ID.
Important: Make sure the Interaction ID is stored successfully before you use it with the Get Call Details module.
Step 5: Retrieve call details
Use the Get Call Details module to pull information about a call you created earlier, such as:
Call status
Call duration
Call summary
Hangup reason - the friendly end reason, the customer reason and similar
Intent signals, such as the caller persona
Add a new module after your call step, or in a separate workflow triggered later.
Search for Kickcall and select Get Call Details.
Select the same Location and Agent from the dynamic dropdowns that were used to create the call.
Provide the Interaction ID - if you stored it on the record, reference that field, for example
{{record.kickcall_last_interaction_id}}.Save the module.
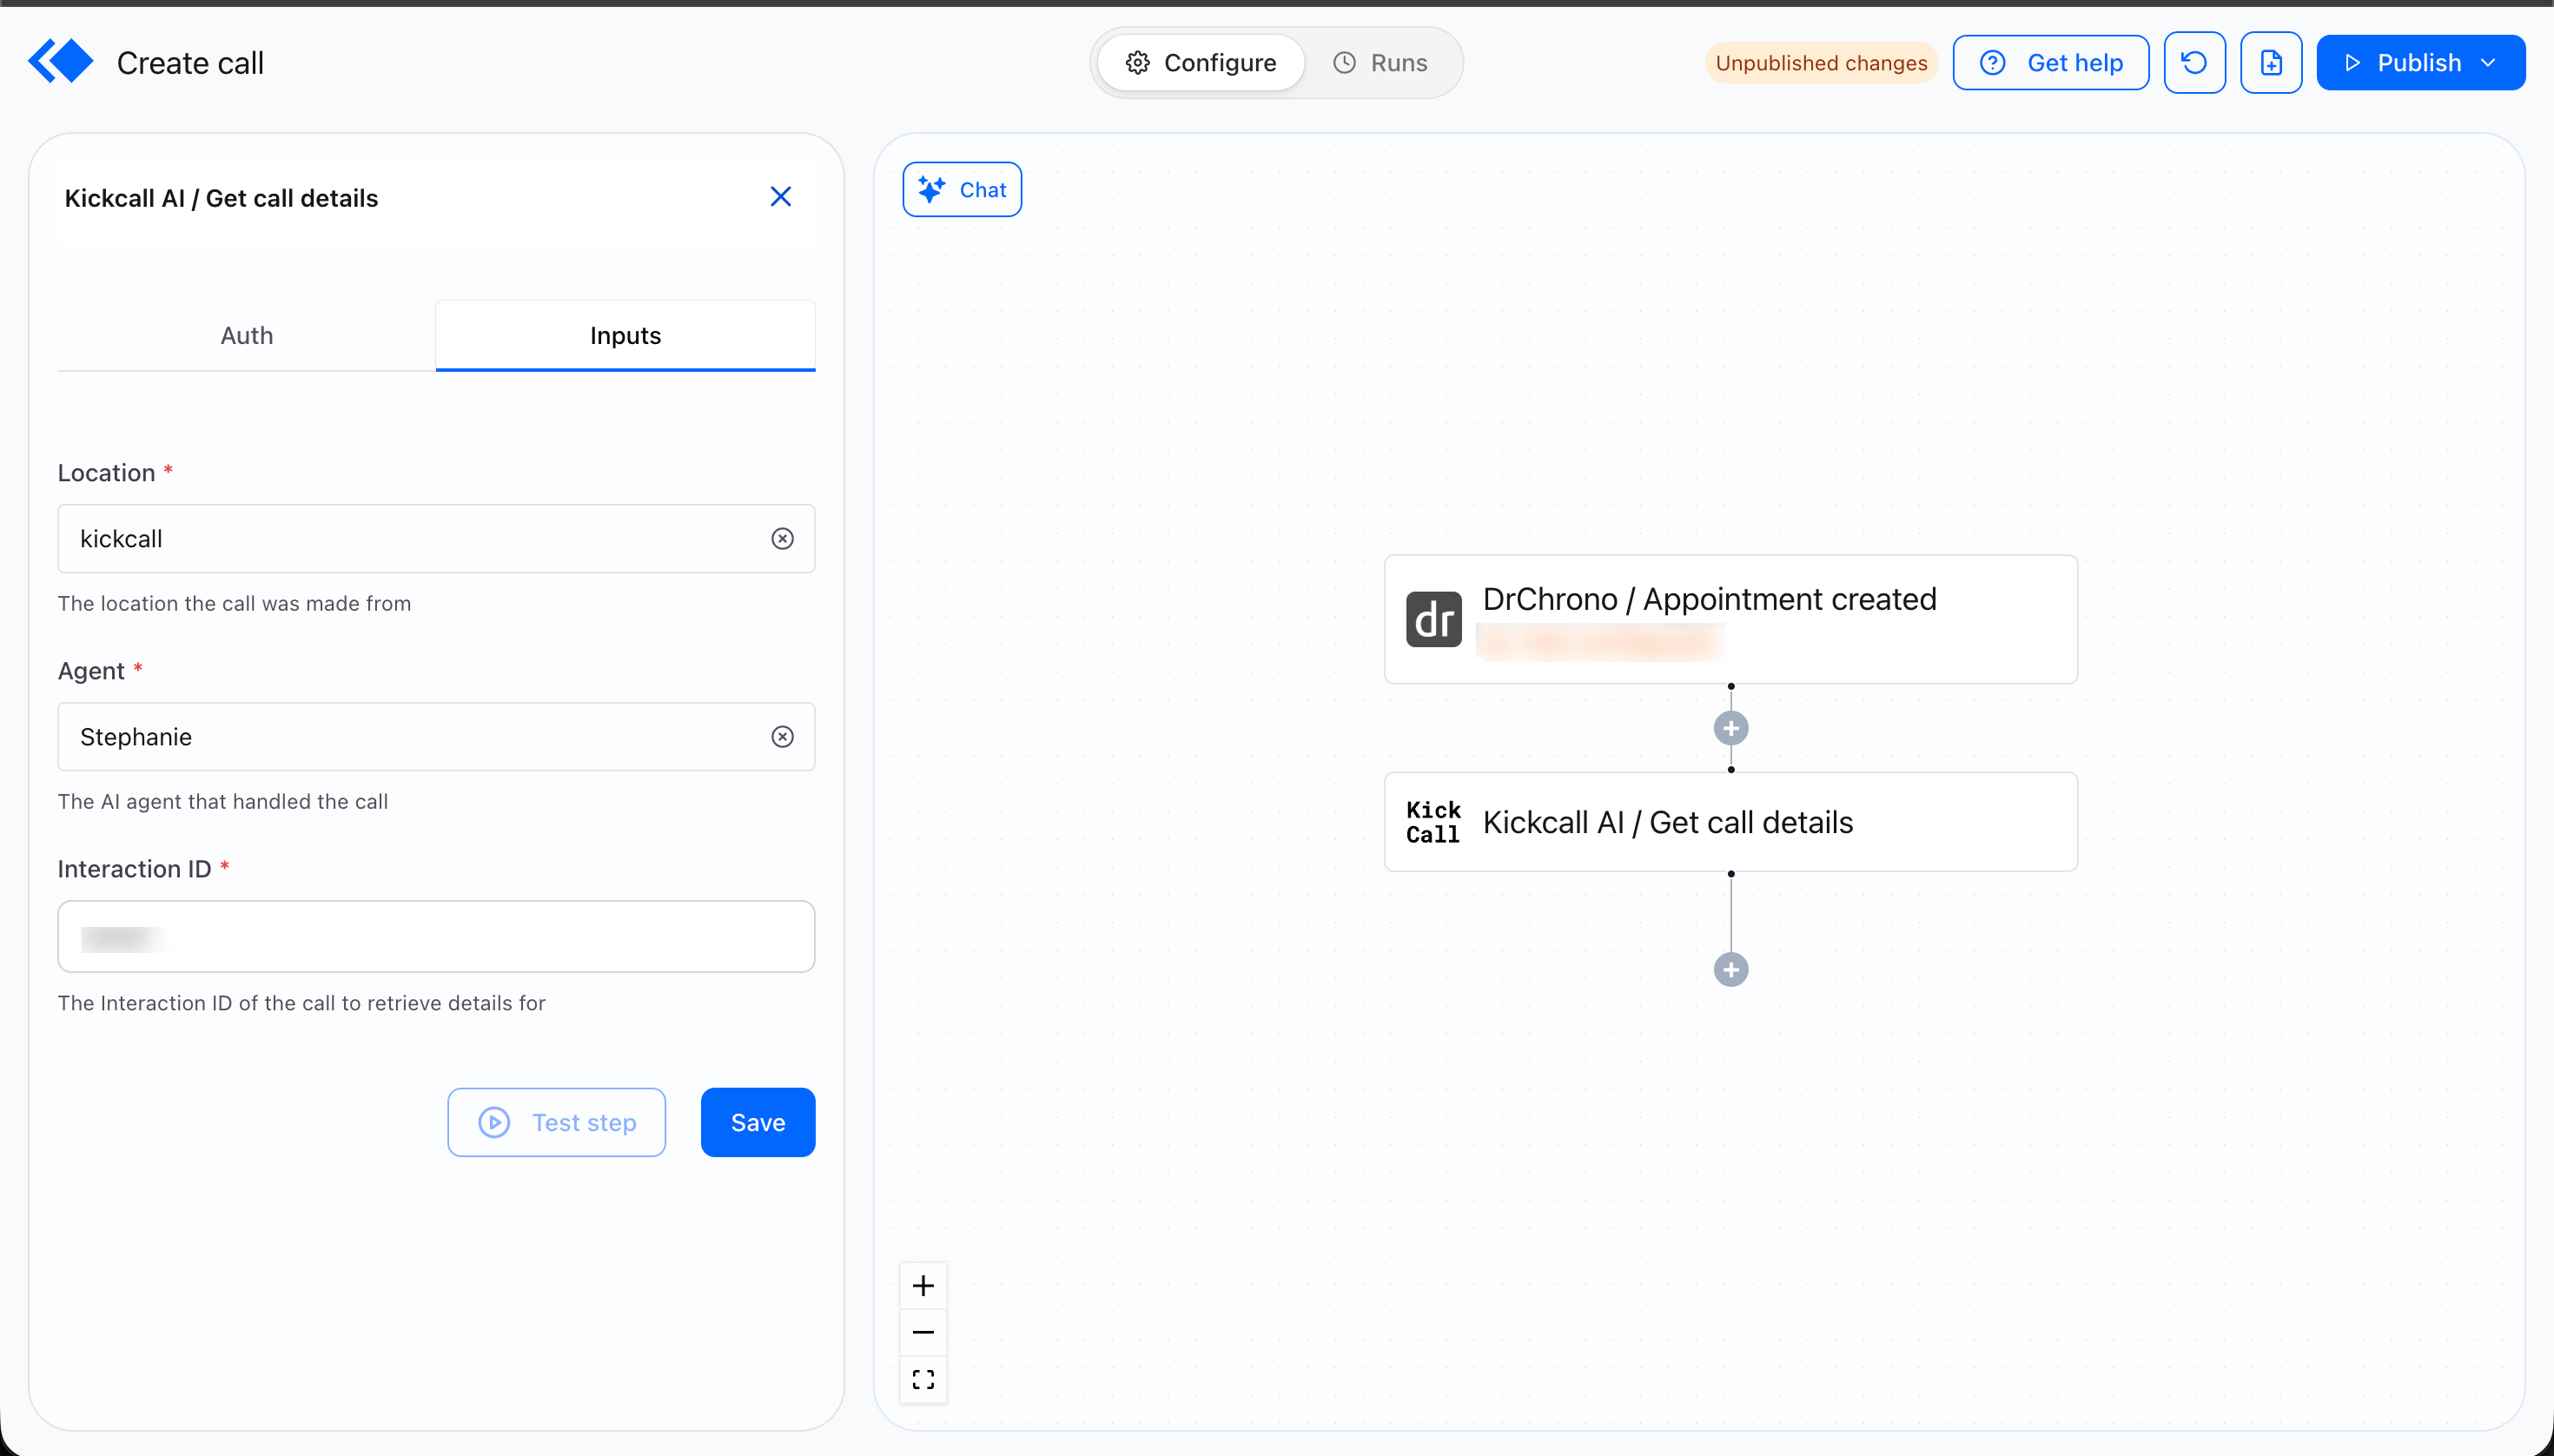
Step 6: Build your workflow automation
With Create Phone Call and Get Call Details in place, Keragon's condition and filter logic does the rest:
Add a Condition module after Get Call Details to branch on call status - completed, no-answer, failed or voicemail.
On a completed call, route to an Update Record module to log the outcome and the call summary.
On a no-answer or failed call, route to a retry branch, or hand off to a Slack or email notification for staff follow-up.
Use the call summary or intent signals returned by Get Call Details to trigger downstream actions, such as flagging a record for manual review.
A full example looks like this: Trigger → Create Phone Call → Update Record (Interaction ID) → Get Call Details → Condition (call outcome) → branch action.
Troubleshooting
Call failed to initiate - usually an incorrect or unsupported phone number format. Check the number includes a valid country code and is formatted as E.164, and add a Format Text module before Create Phone Call if needed.
Authentication failed - the Kickcall API key is invalid or expired. Generate a new key in your Kickcall dashboard and reconnect the Kickcall connection in Keragon.
Agent is not responding - the Agent ID is incorrect or the agent is inactive. Confirm the ID in your dashboard and make sure the agent is active.
Get Call does not return the expected information - the Interaction ID is missing or incorrect. Confirm the ID returned by Create Phone Call was stored before Get Call runs.
Workflow runs but no call is placed - an upstream trigger condition filtered the record out, or the workflow is still in draft or test mode. Check the Keragon run history and confirm the workflow is published and active.
If you still need help, submit a ticket to the Kickcall support team and include your Kickcall account email, the Keragon workspace and workflow name, the Kickcall module being used, the Interaction ID, the error message and a screenshot of the module configuration. That detail lets the team resolve the issue much faster.
Frequently Asked Questions
How do I connect Kickcall to Keragon?
How do I connect Kickcall to Keragon?
Add the Kickcall AI module to a Keragon workflow and complete the connection using your Kickcall API key and account email.
What actions does Kickcall provide in Keragon?
What actions does Kickcall provide in Keragon?
Four actions are available: Create Phone Call, which initiates an outbound call, Get Call, which retrieves the details of a previously created call, Get Locations, which retrieves the list of your business locations, and Get Agents, retrieve the list of agents available at specific locations.
Can I trigger a Kickcall call from a Keragon workflow?
Can I trigger a Kickcall call from a Keragon workflow?
Yes. Add the Create Phone Call module to any workflow and configure the Location ID, Agent ID and number to dial.
Can I use fields from my EHR, CRM or form in a Kickcall call?
Can I use fields from my EHR, CRM or form in a Kickcall call?
Yes. Any information collected earlier in the workflow such as - patient name, phone number, or appointment time can be mapped to Kickcall fields using LLM Dynamic Variables, allowing contact and workflow information to be passed to the agent.
What is the Interaction ID?
What is the Interaction ID?
It is the unique identifier for a Kickcall call. It is returned when the call is created and is what Get Call uses to look the call up.
Why should I save the Interaction ID?
Why should I save the Interaction ID?
Saving it - usually in a custom field on the record, or as a workflow variable - lets you reference the same call later and retrieve its details with Get Call.
Can I use call details in later workflow steps?
Can I use call details in later workflow steps?
Yes. Anything returned by Get Call Details can be used in Keragon condition modules and downstream actions.
What phone number format should I use?
What phone number format should I use?
Use a fully formatted E.164 number including the country code, for example +12345678900. Normalize the number with a Format Text or Function module if your source data does not already include it.
Can I pass information to the Kickcall AI agent?
Can I pass information to the Kickcall AI agent?
Yes. Use Kickcall LLM Dynamic Variables to send record or workflow information to the agent.
What can I use the integration for?
What can I use the integration for?
Patient intake follow-up, appointment reminders and confirmations, lead qualification, no-show recovery calls, post-visit check-ins, insurance verification hand-offs and any other phone automation you want to run from a workflow.
Was this helpful?
Still need help? Ask the team