HubSpot
Written By Maruf Ansari
Last updated About 2 months ago
The HubSpot integration connects your Kickcall account with HubSpot so you can bring AI-powered phone calls into your workflows. Once connected, you can trigger outbound calls from a HubSpot workflow, pass contact information into your Kickcall AI agent, and pull call details back to decide what happens next - all inside HubSpot.
What you can build: lead follow-up, lead qualification, appointment reminders, patient follow-up, customer follow-up, sales outreach and any other contact-based phone automation.
Step 1 - Connect Kickcall AI to HubSpot
HubSpot uses OAuth rather than a manually entered API key. You don't need to copy and paste any credentials - HubSpot handles the secure connection for you once you approve the requested permissions.
Install Kickcall AI in HubSpot
In HubSpot, go to the App Marketplace and search for Kickcall AI.
Click Install app.
Review the requested permissions on the authorization screen - Kickcall AI requests access to Contacts (to look up phone numbers) and workflow automation.
Click Connect app to approve.
You'll be redirected back once the connection completes.
Note: Kickcall AI is a shared-access app - it only needs to be installed once per HubSpot account. The first person to install it sets it up for everyone in that account.
Once the connection succeeds, Kickcall actions become available inside HubSpot workflows and can be reused across any contact-based workflow in the same HubSpot account.
Step 2 - Create a phone call workflow
Create a HubSpot workflow that will trigger the outbound call. Kickcall AI's actions are currently available in contact-based workflows. Common triggers include:
A new contact is created
A form is submitted
A contact enters a specific list or lifecycle stage
A property changes (e.g. an appointment date is set)
A deal reaches a specific stage
A simple workflow looks like this: Contact enrolled → Create Phone Call → Get Call Details → Branch on call status → Update contact.
Tip: Any HubSpot contact workflow trigger that makes sense for your business will work. Kickcall is designed to sit inside your existing automation, not replace it.
Step 3 - Configure the Create Phone Call action
Open your workflow and click to add a new action.
Search for Kickcall under Integrated apps and select Create Phone Call.
Fill in the required fields, add optional fields if needed, and save the action.
Required fields
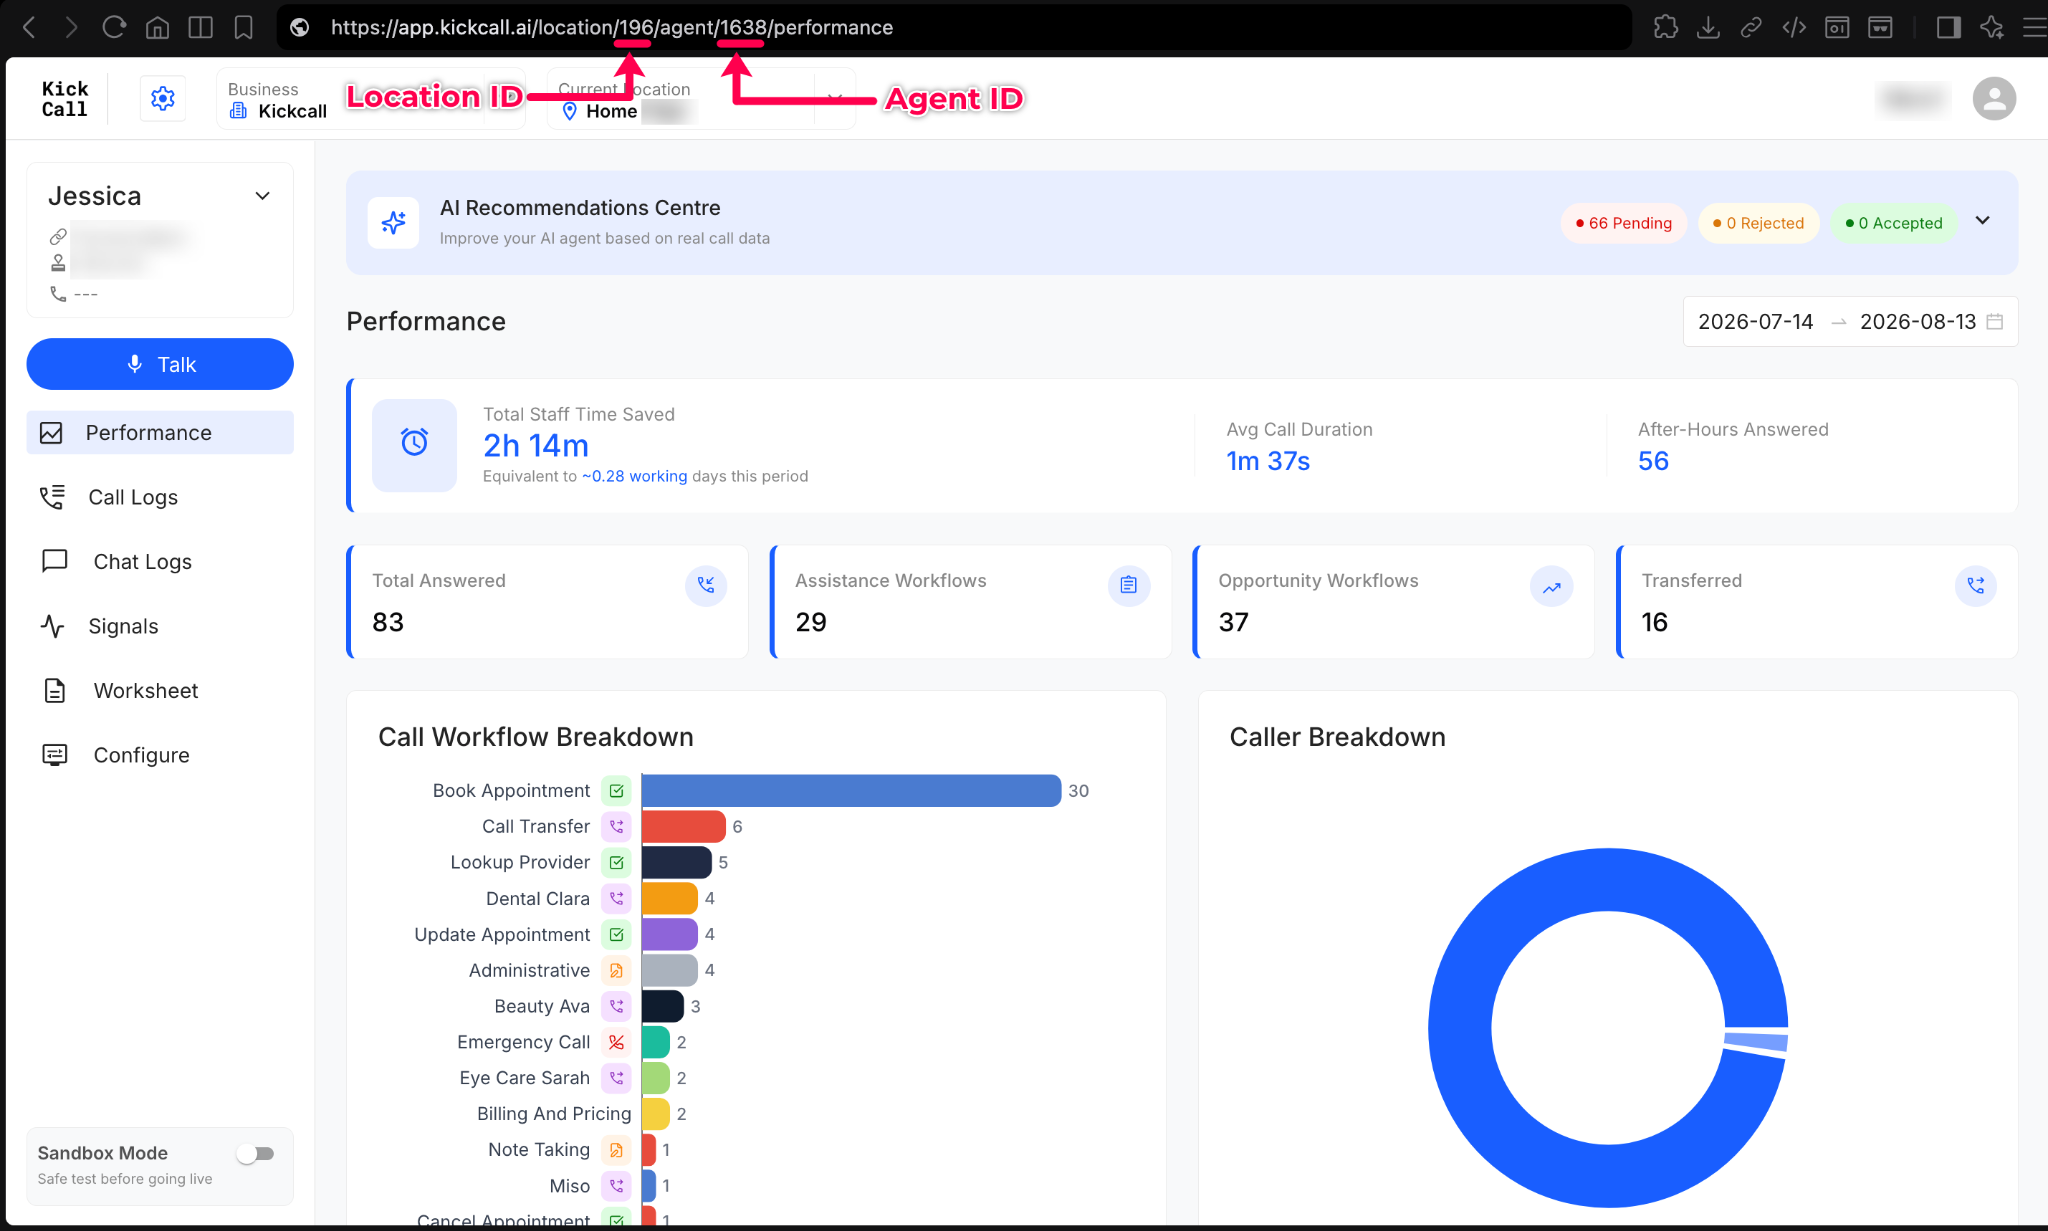
Location - the Kickcall location the call should be created under.
Agent - the Kickcall AI agent that will handle the outbound call. This list updates based on the Location you select.
To Number - the phone number Kickcall should call. Use the contact's phone number property in international format, e.g. +12345678900.
Important: Make sure the contact phone number property is stored in full international format (including the country code). Calls will fail to initiate if the number is missing a country code or contains formatting characters the API doesn't expect.
Copy your Location ID and Agent ID straight from the URL of the agent dashboard, as shown below.
Optional fields
LLM Dynamic Variables - pass information from HubSpot into the AI agent's prompt: the contact's name, appointment time, service type, or anything else the agent should know before it speaks. Add these as key/value pairs.
Metadata - arbitrary key/value pairs for your own reference (e.g. an internal customer ID). Not used by the agent - just stored on the call record for you to retrieve later.
Step 4 - Store the Interaction ID
When Create Phone Call runs successfully, Kickcall returns details about the new call, including the Interaction ID - the unique identifier for that call.
A typical pattern is: Create Phone Call → Branch (if status = queued) → Set a workflow-only field or contact property → store the Interaction ID. Saving it gives you a reusable reference for later steps.
Important: Make sure the Interaction ID is stored successfully before you use it with the Get Call Details action.
Step 5 - Retrieve call details
Use the Get Call Details action to pull information about a call you created earlier:
Add a new action after your call step.
Search for Kickcall AI and select Get Call Details.
Enter the Location and Agent, matching what you used in Create Phone Call.
Provide the Interaction ID - reference the property or workflow field where you stored it in Step 4.
Save the action.
Step 6 - Build your workflow automation
Everything returned by Get Call Details can feed HubSpot branches and actions. Branch on call status, notify your team when a call completes, update a contact property with the call summary, or trigger a follow-up email or task based on how the conversation went.
A full example looks like this: Trigger → Create Phone Call → Store Interaction ID → Get Call Details → Branch (call outcome) → follow-up action.
Troubleshooting
Call failed to initiate - usually an incorrect or unsupported phone number format. Confirm the number includes a valid country code and is formatted in full international format.
Action returns a 404 error - the Location or Agent selected doesn't match an active Kickcall record. Reselect both fields, starting with Location.
Action returns a 401 error - the HubSpot connection has expired or was disconnected. Reinstall the app from Settings → Connected Apps.
Kickcall actions don't appear in the workflow builder - confirm the app has been fully installed (not just approved) by an admin in your account. Approval alone doesn't complete installation - someone still needs to click through the connect flow.
Dynamic variables error - check that each key/value pair is filled in correctly; empty keys can cause the action to fail.
Get Call Details does not return the expected information - the Interaction ID is missing or incorrect. Confirm the ID returned by Create Phone Call was stored before Get Call Details runs.
If you still need help, submit a ticket to the Kickcall support team and include your Kickcall account email, the HubSpot portal, the workflow name, the Kickcall action being used, the Interaction ID, the error message, and a screenshot of the action configuration. That detail lets the team resolve the issue much faster.
Frequently Asked Questions
How do I connect Kickcall to HubSpot?
How do I connect Kickcall to HubSpot?
Install Kickcall AI from the HubSpot App Marketplace and approve the requested permissions. No manual API key entry is required, HubSpot handles the secure connection through OAuth.
Does everyone in my HubSpot account need to install the app?
Does everyone in my HubSpot account need to install the app?
No. Kickcall AI is a shared-access app, it only needs to be installed once per HubSpot account. The first person to install it sets it up for everyone in that account.
What actions does Kickcall provide in HubSpot?
What actions does Kickcall provide in HubSpot?
Two workflow actions: Create Phone Call, which triggers an outbound AI call, and Get Call Details, which retrieves the status, duration, hangup reason and summary of a call already placed.
Which workflow types support Kickcall actions?
Which workflow types support Kickcall actions?
Kickcall AI's actions are currently available in contact-based workflows.
Can I trigger a call from a HubSpot workflow using Kickcall?
Can I trigger a call from a HubSpot workflow using Kickcall?
Yes, add the Create Phone Call action to any contact-based workflow, triggered by whatever event makes sense for your business.
Can I use HubSpot contact properties in a Kickcall call?
Can I use HubSpot contact properties in a Kickcall call?
Yes, map the contact's phone number property into the To Number field, and pass any other contact details into the agent using LLM Dynamic Variables.
What is the Interaction ID?
What is the Interaction ID?
A unique identifier returned when a call is created. It's used to look up that specific call's details later with Get Call Details.
Why should I save the Interaction ID?
Why should I save the Interaction ID?
Without it, you have no way to retrieve that call's outcome in a later workflow step. Store it on the contact or as a workflow field immediately after Create Phone Call runs.
Can I use call details in later workflow steps?
Can I use call details in later workflow steps?
Yes, once Get Call Details runs, its output (status, duration, summary, etc.) is available to any branch or action further down the workflow.
What phone number format should I use?
What phone number format should I use?
Full international format, including the country code (e.g. +12345678900). Calls may fail to initiate without it.
What can I use the integration for?
What can I use the integration for?
Lead follow-up, lead qualification, appointment reminders, patient and customer follow-up, sales outreach, and any other workflow where an automated phone conversation adds value.
Was this helpful?
Still need help? Ask the team