n8n
Connect Kickcall & Automate Phone Calls
Written By Maruf Ansari
Last updated About 1 month ago
The n8n integration connects your Kickcall account with n8n so you can bring AI-powered phone calls into your automated workflows. Once connected, you can trigger outbound calls from any n8n workflow, pass dynamic data into your Kickcall AI agent, and pull the call summary back to decide what happens next.
What you can build: lead follow-up, lead qualification, appointment reminders, patient follow-up, customer follow-up, sales outreach and any other multi-step phone automation.
Step 1: Connect Kickcall to n8n
Before you build a phone call workflow, connect your Kickcall account to n8n. You need an active Kickcall account and a Kickcall API key.
Get your Kickcall API key
Log in to your Kickcall dashboard.
Go to API Keys in the left sidebar.
Create a new key, or copy an existing one.
Store the key securely - you will need it during the n8n connection.
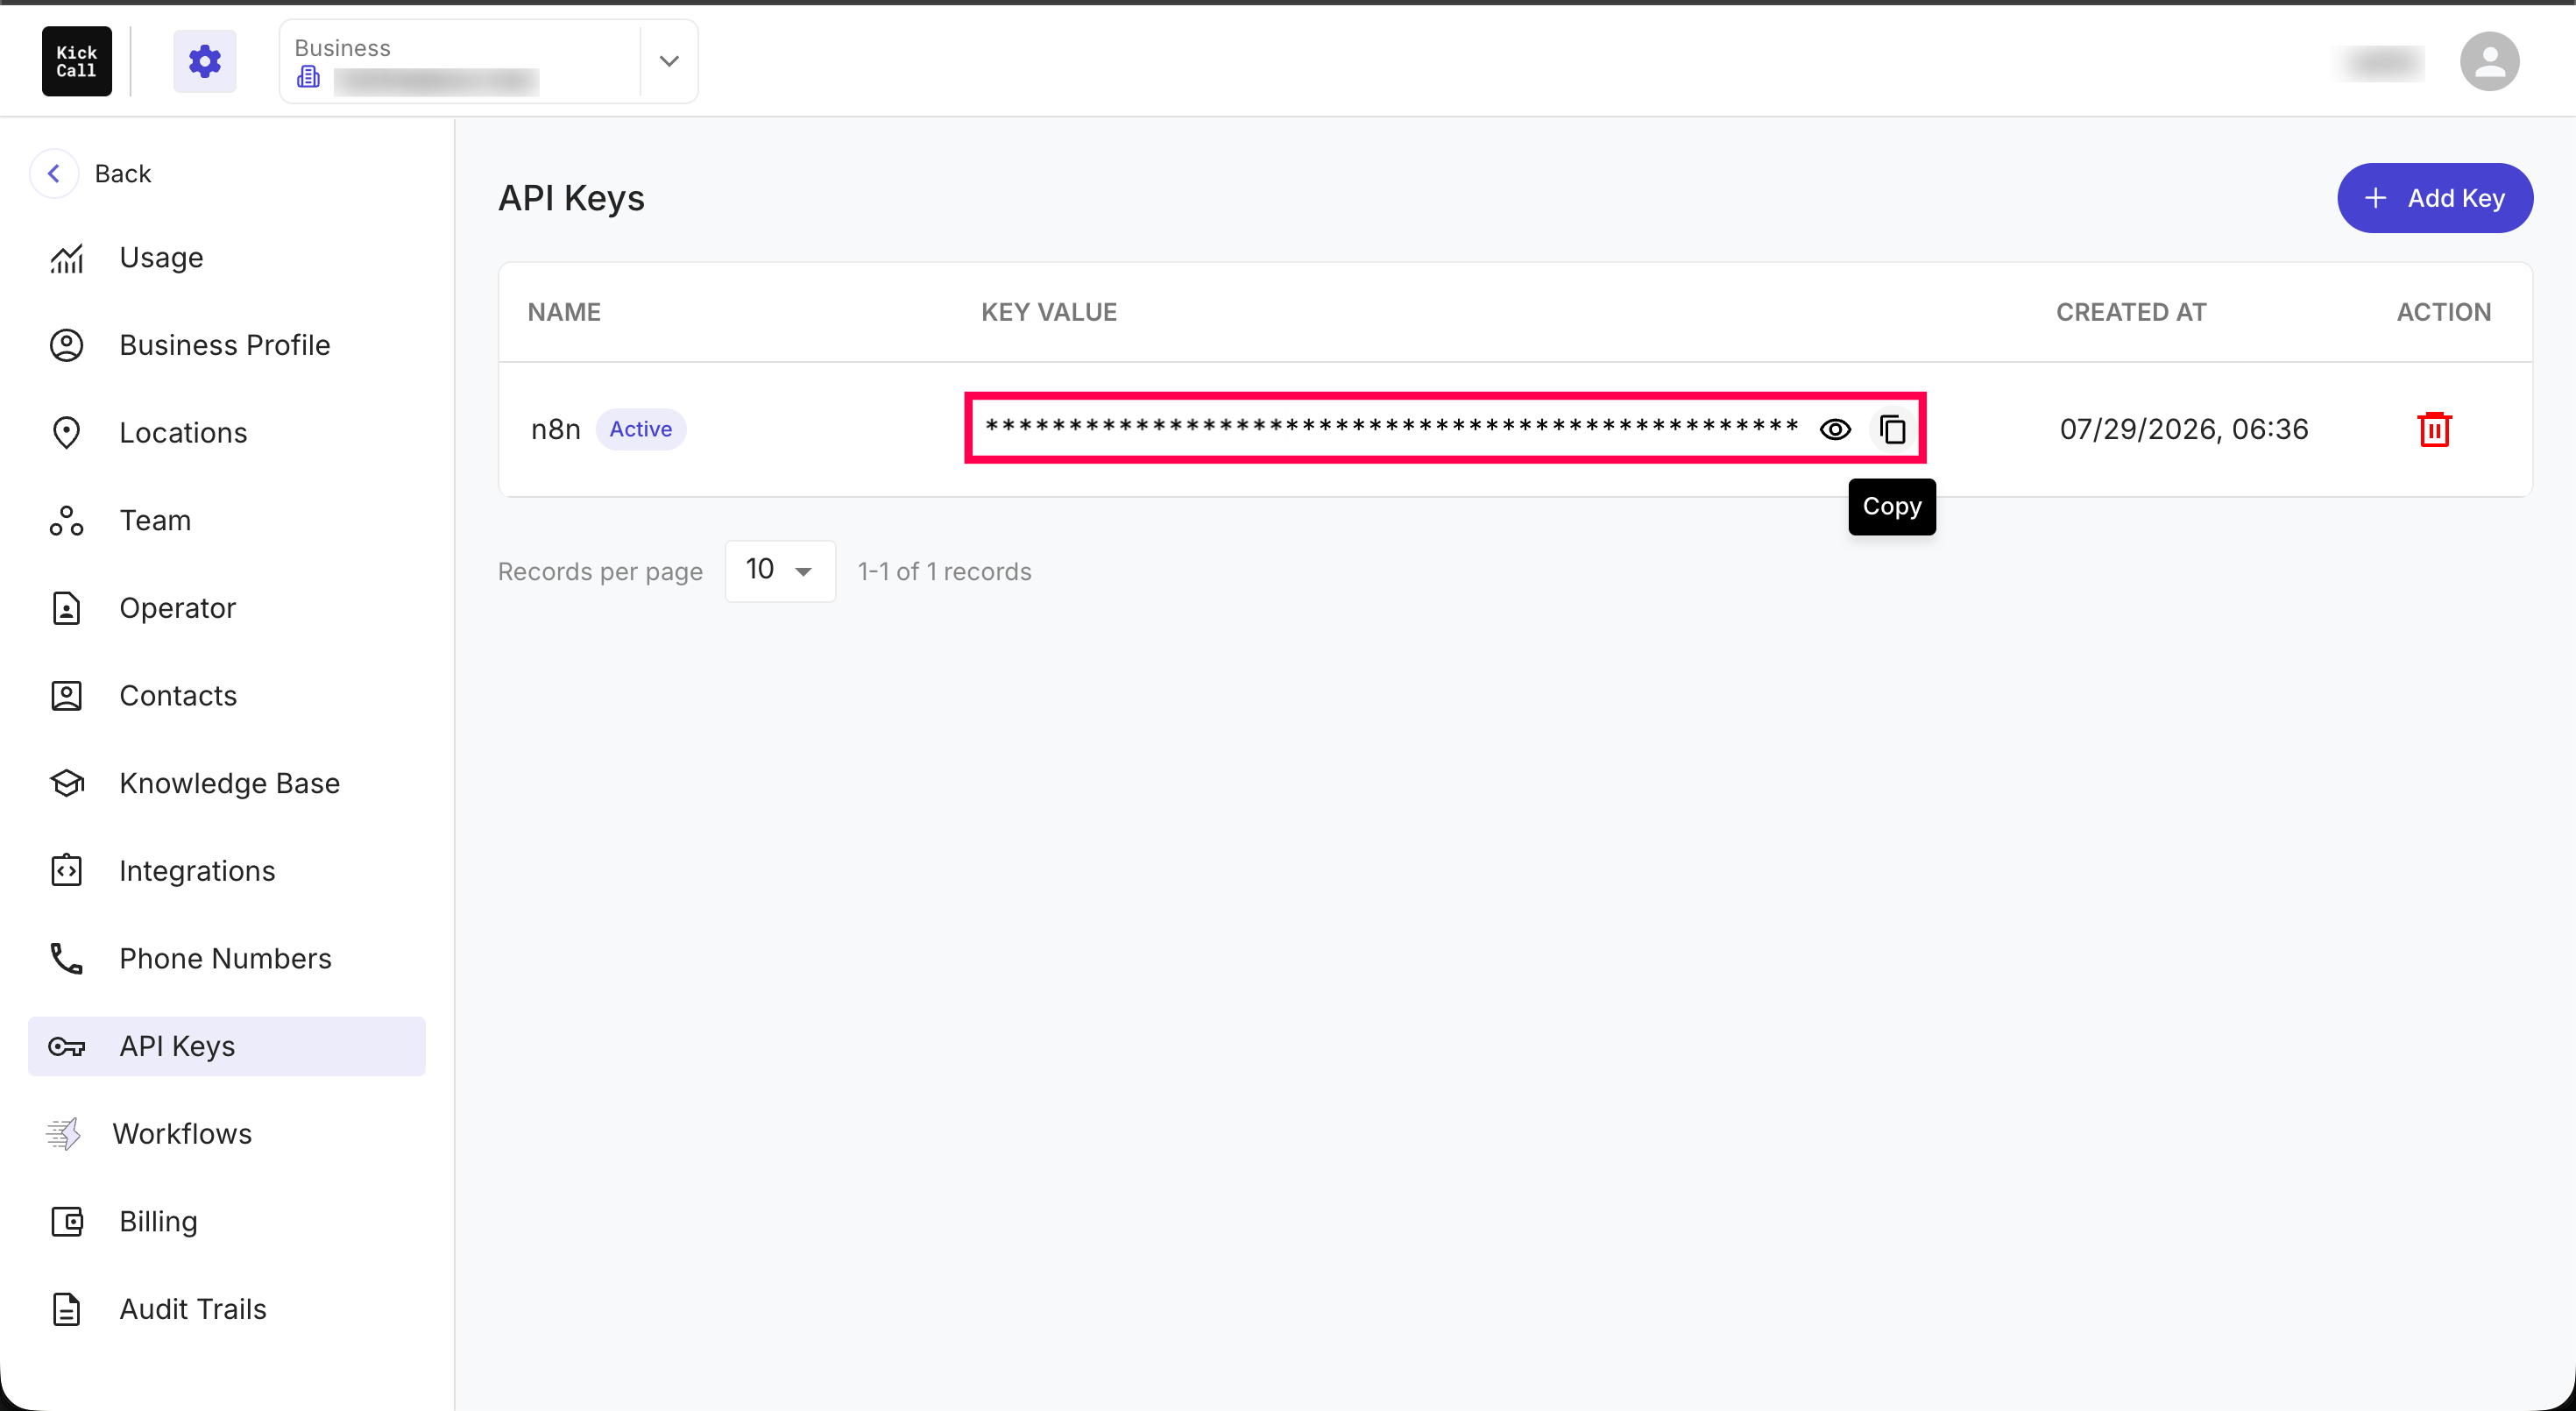
Important: Treat your API key like a password. Never share it publicly, commit it to a repository, or include it in screenshots or shared workflows.
Install Kickcall in n8n
Open your n8n workflow canvas, search for Kickcall AI, and click on it to install.
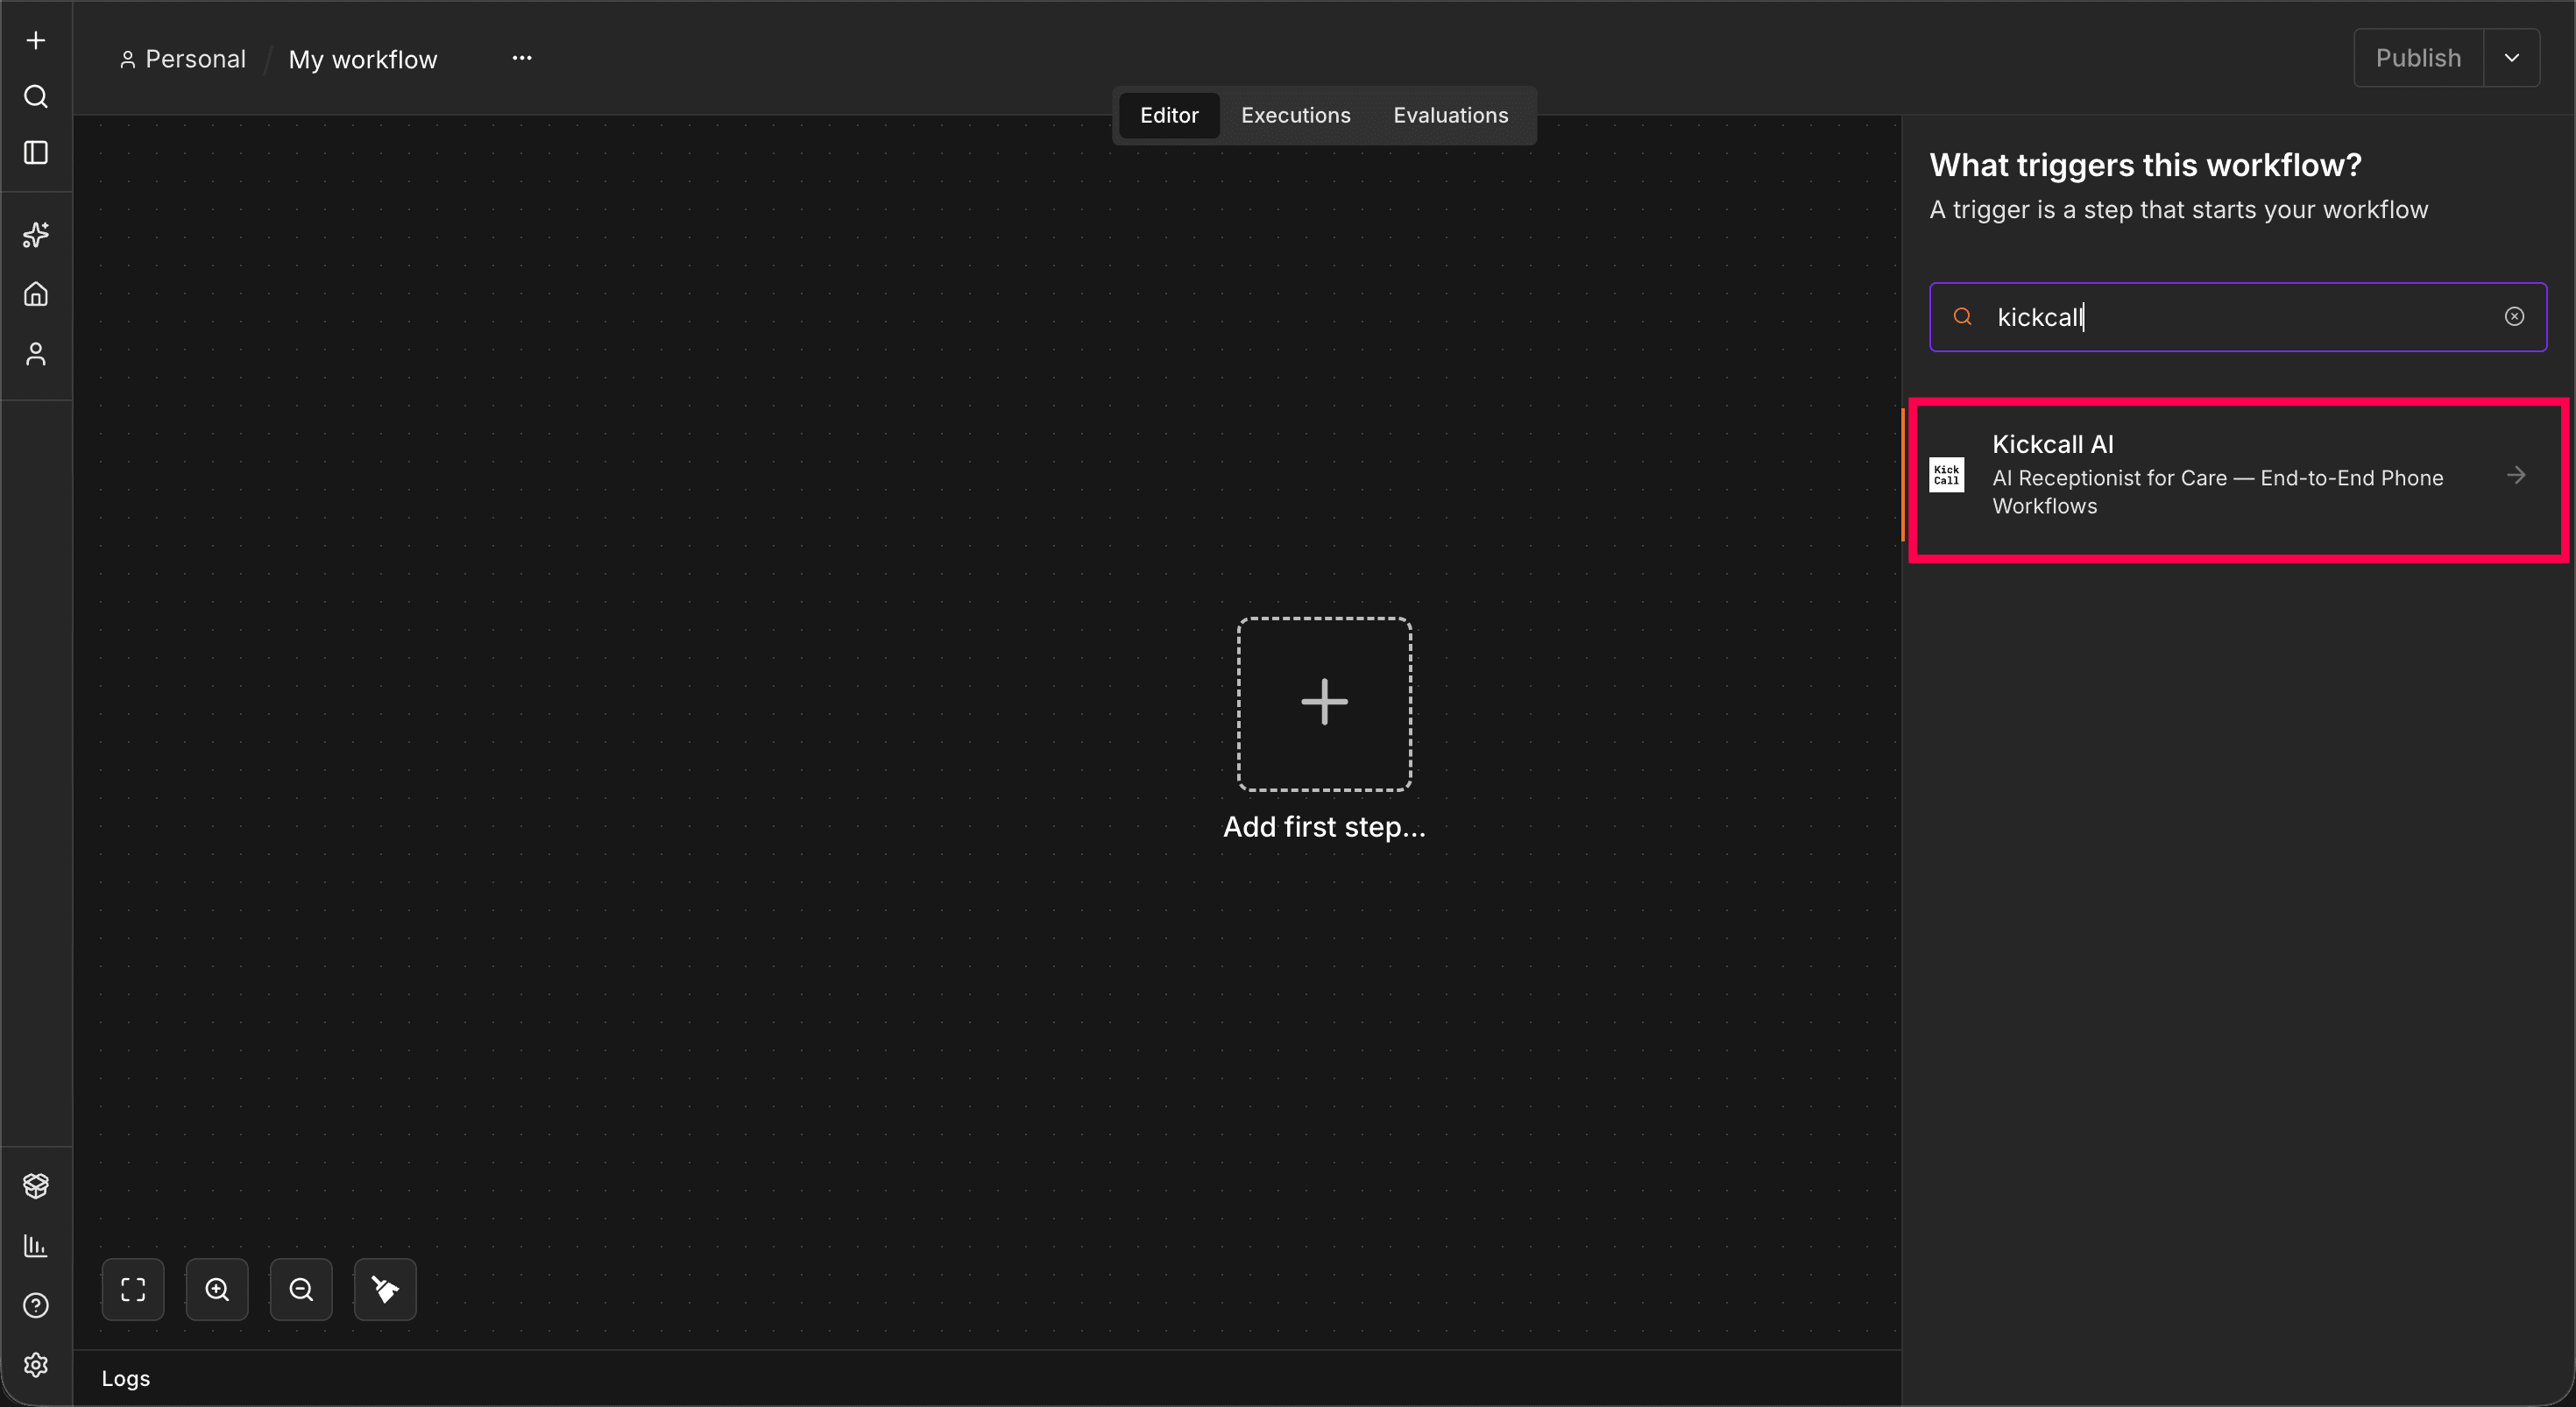
OR go to Settings > Community Nodes in your n8n instance and enter the npm package name: n8n-nodes-kickcall.
Enter the package name
n8n-nodes-kickcalland click Install.Create a new workflow, add the Kickcall AI node and select Create New Credential.
Enter your Kickcall API key
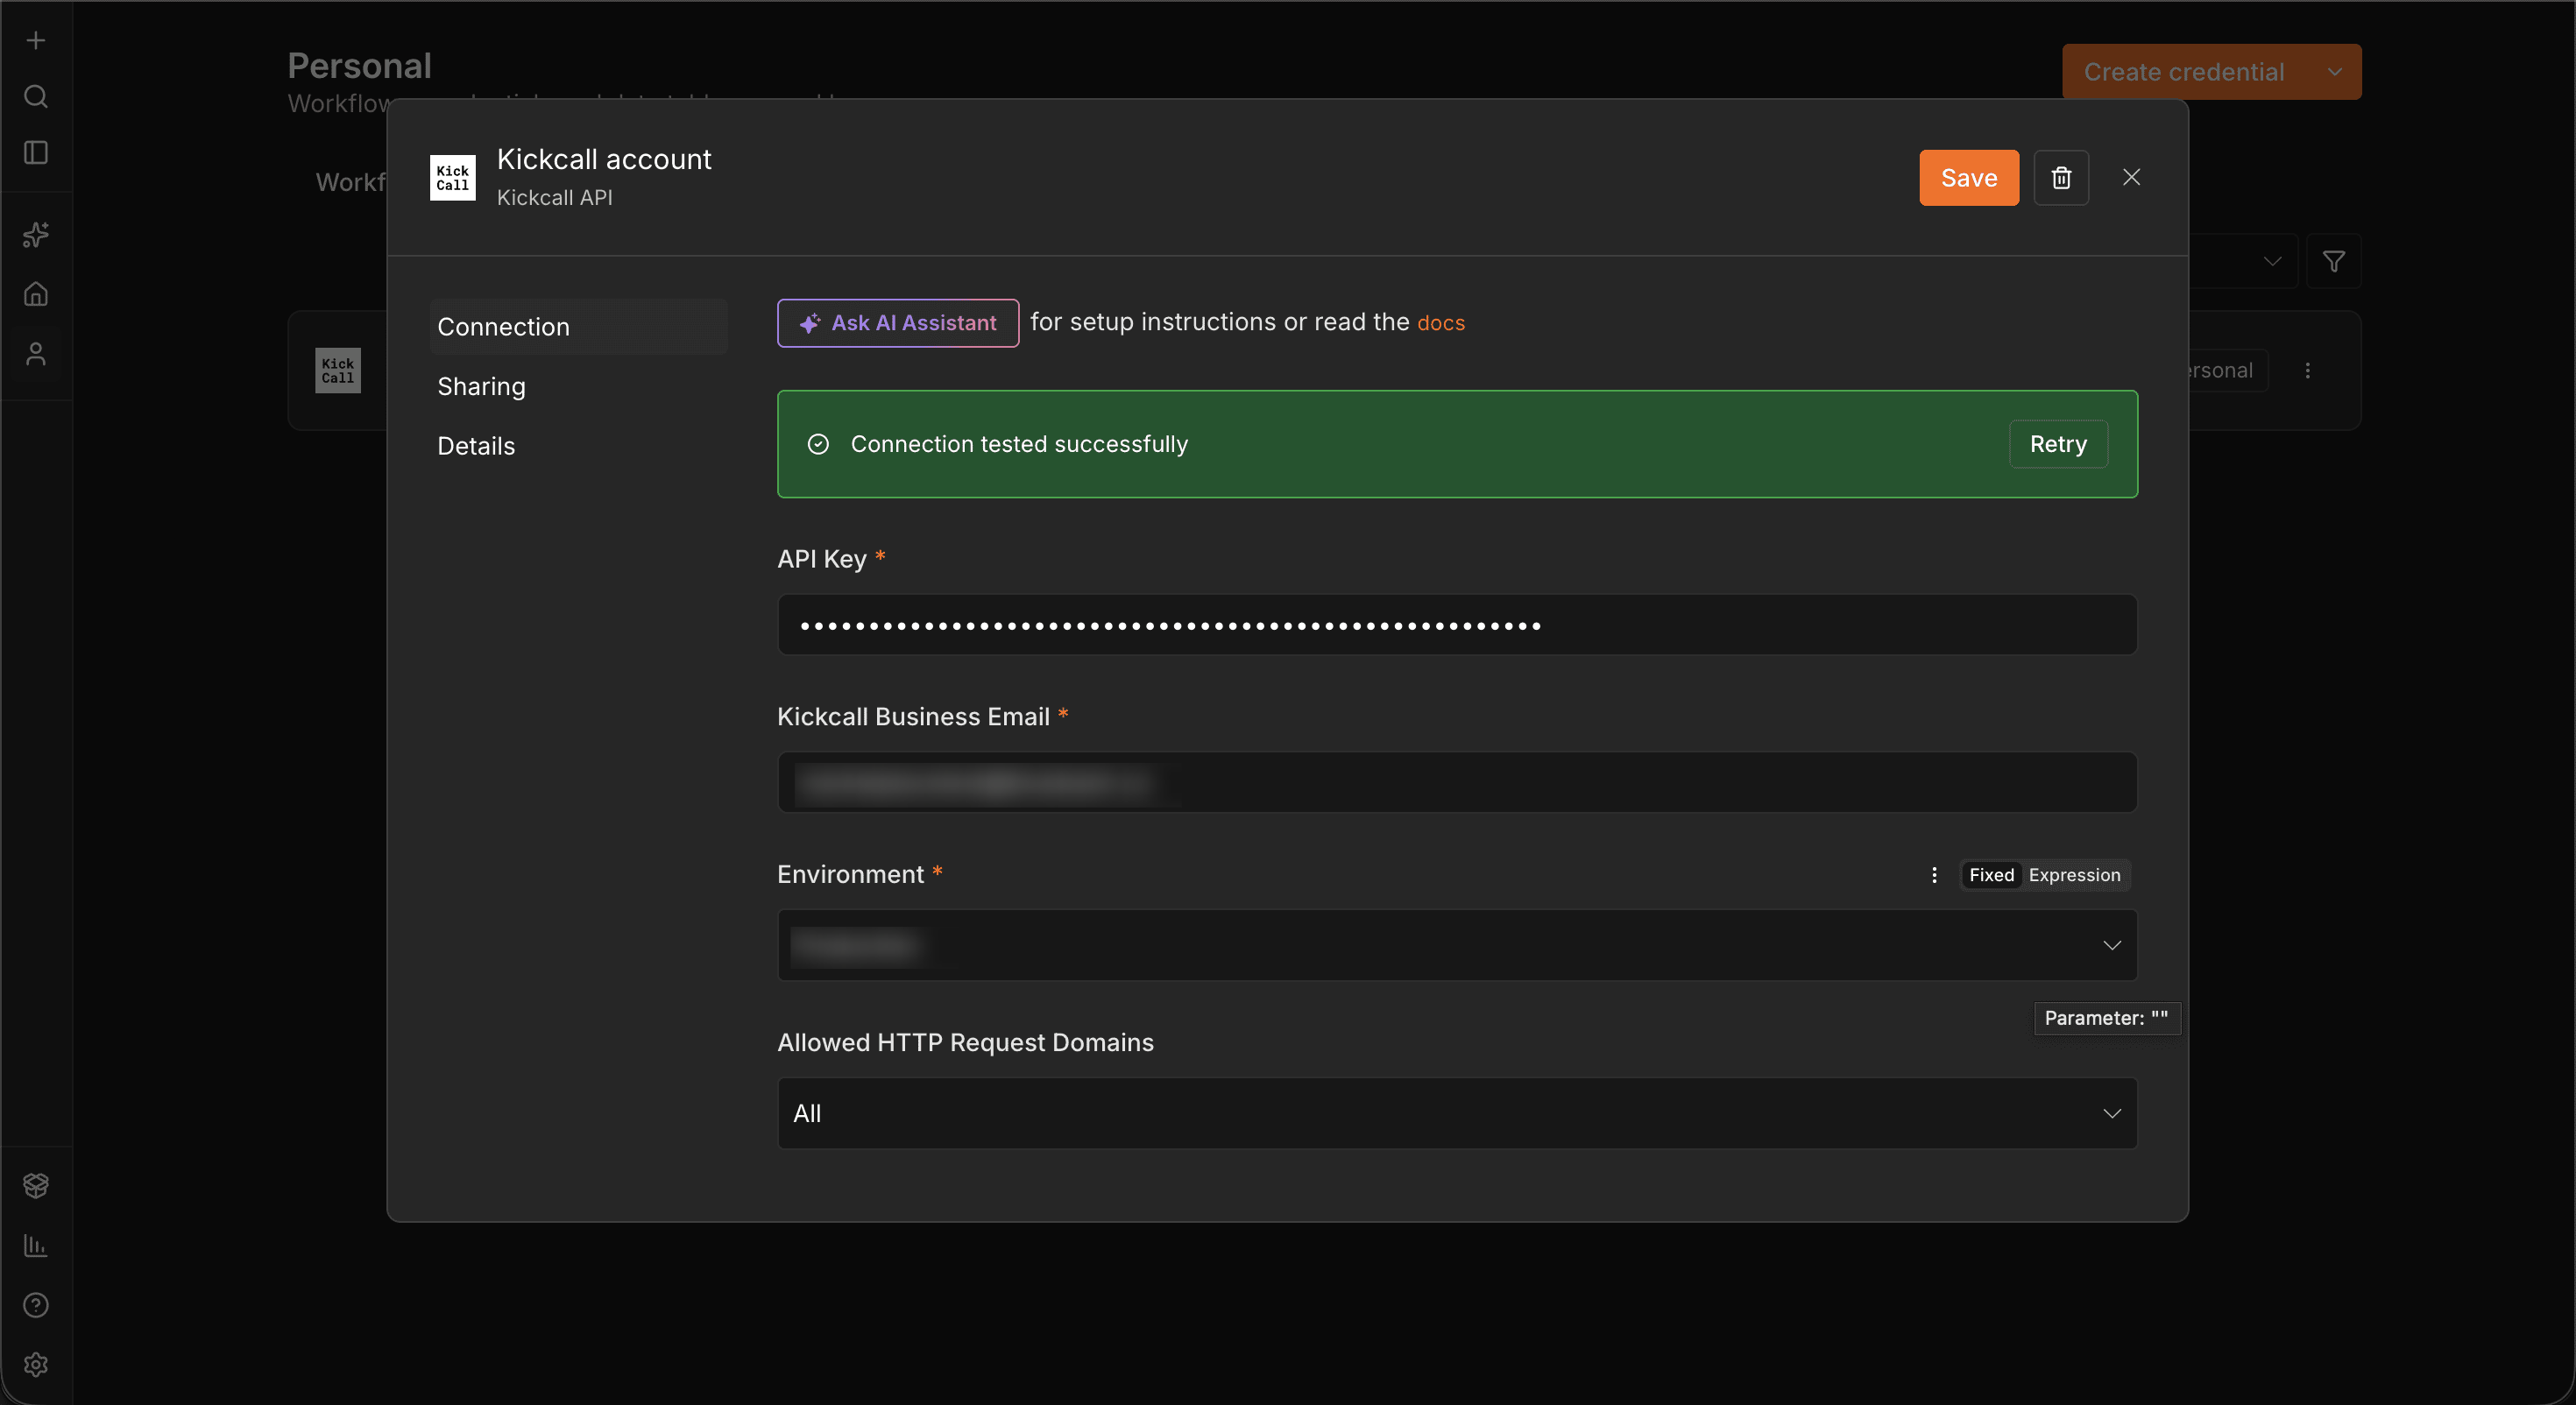
Once the credential saves successfully, Kickcall actions become ready to use inside your n8n workflows.
Step 2: Create a phone call workflow
Create an n8n workflow that will trigger the outbound call. Common triggers include:
A new lead submits a form through a Webhook trigger
A row is added to Google Sheets or Airtable
A CRM such as HubSpot or Salesforce fires a new contact event
A schedule trigger fires for an appointment reminder
A simple workflow looks like this: Webhook Trigger → Kickcall AI (Create Phone Call) → If (check call status) → Slack notification.
Tip: Any n8n trigger that makes sense for your business will work. Kickcall is designed to sit inside your existing automation and accept data from any earlier node.
Step 3: Configure the Create Phone Call action
Open your workflow and click Add node.
Search for Kickcall AI and select the Create Phone Call operation.
Fill in the required fields, using n8n expressions where the value comes from an earlier node.
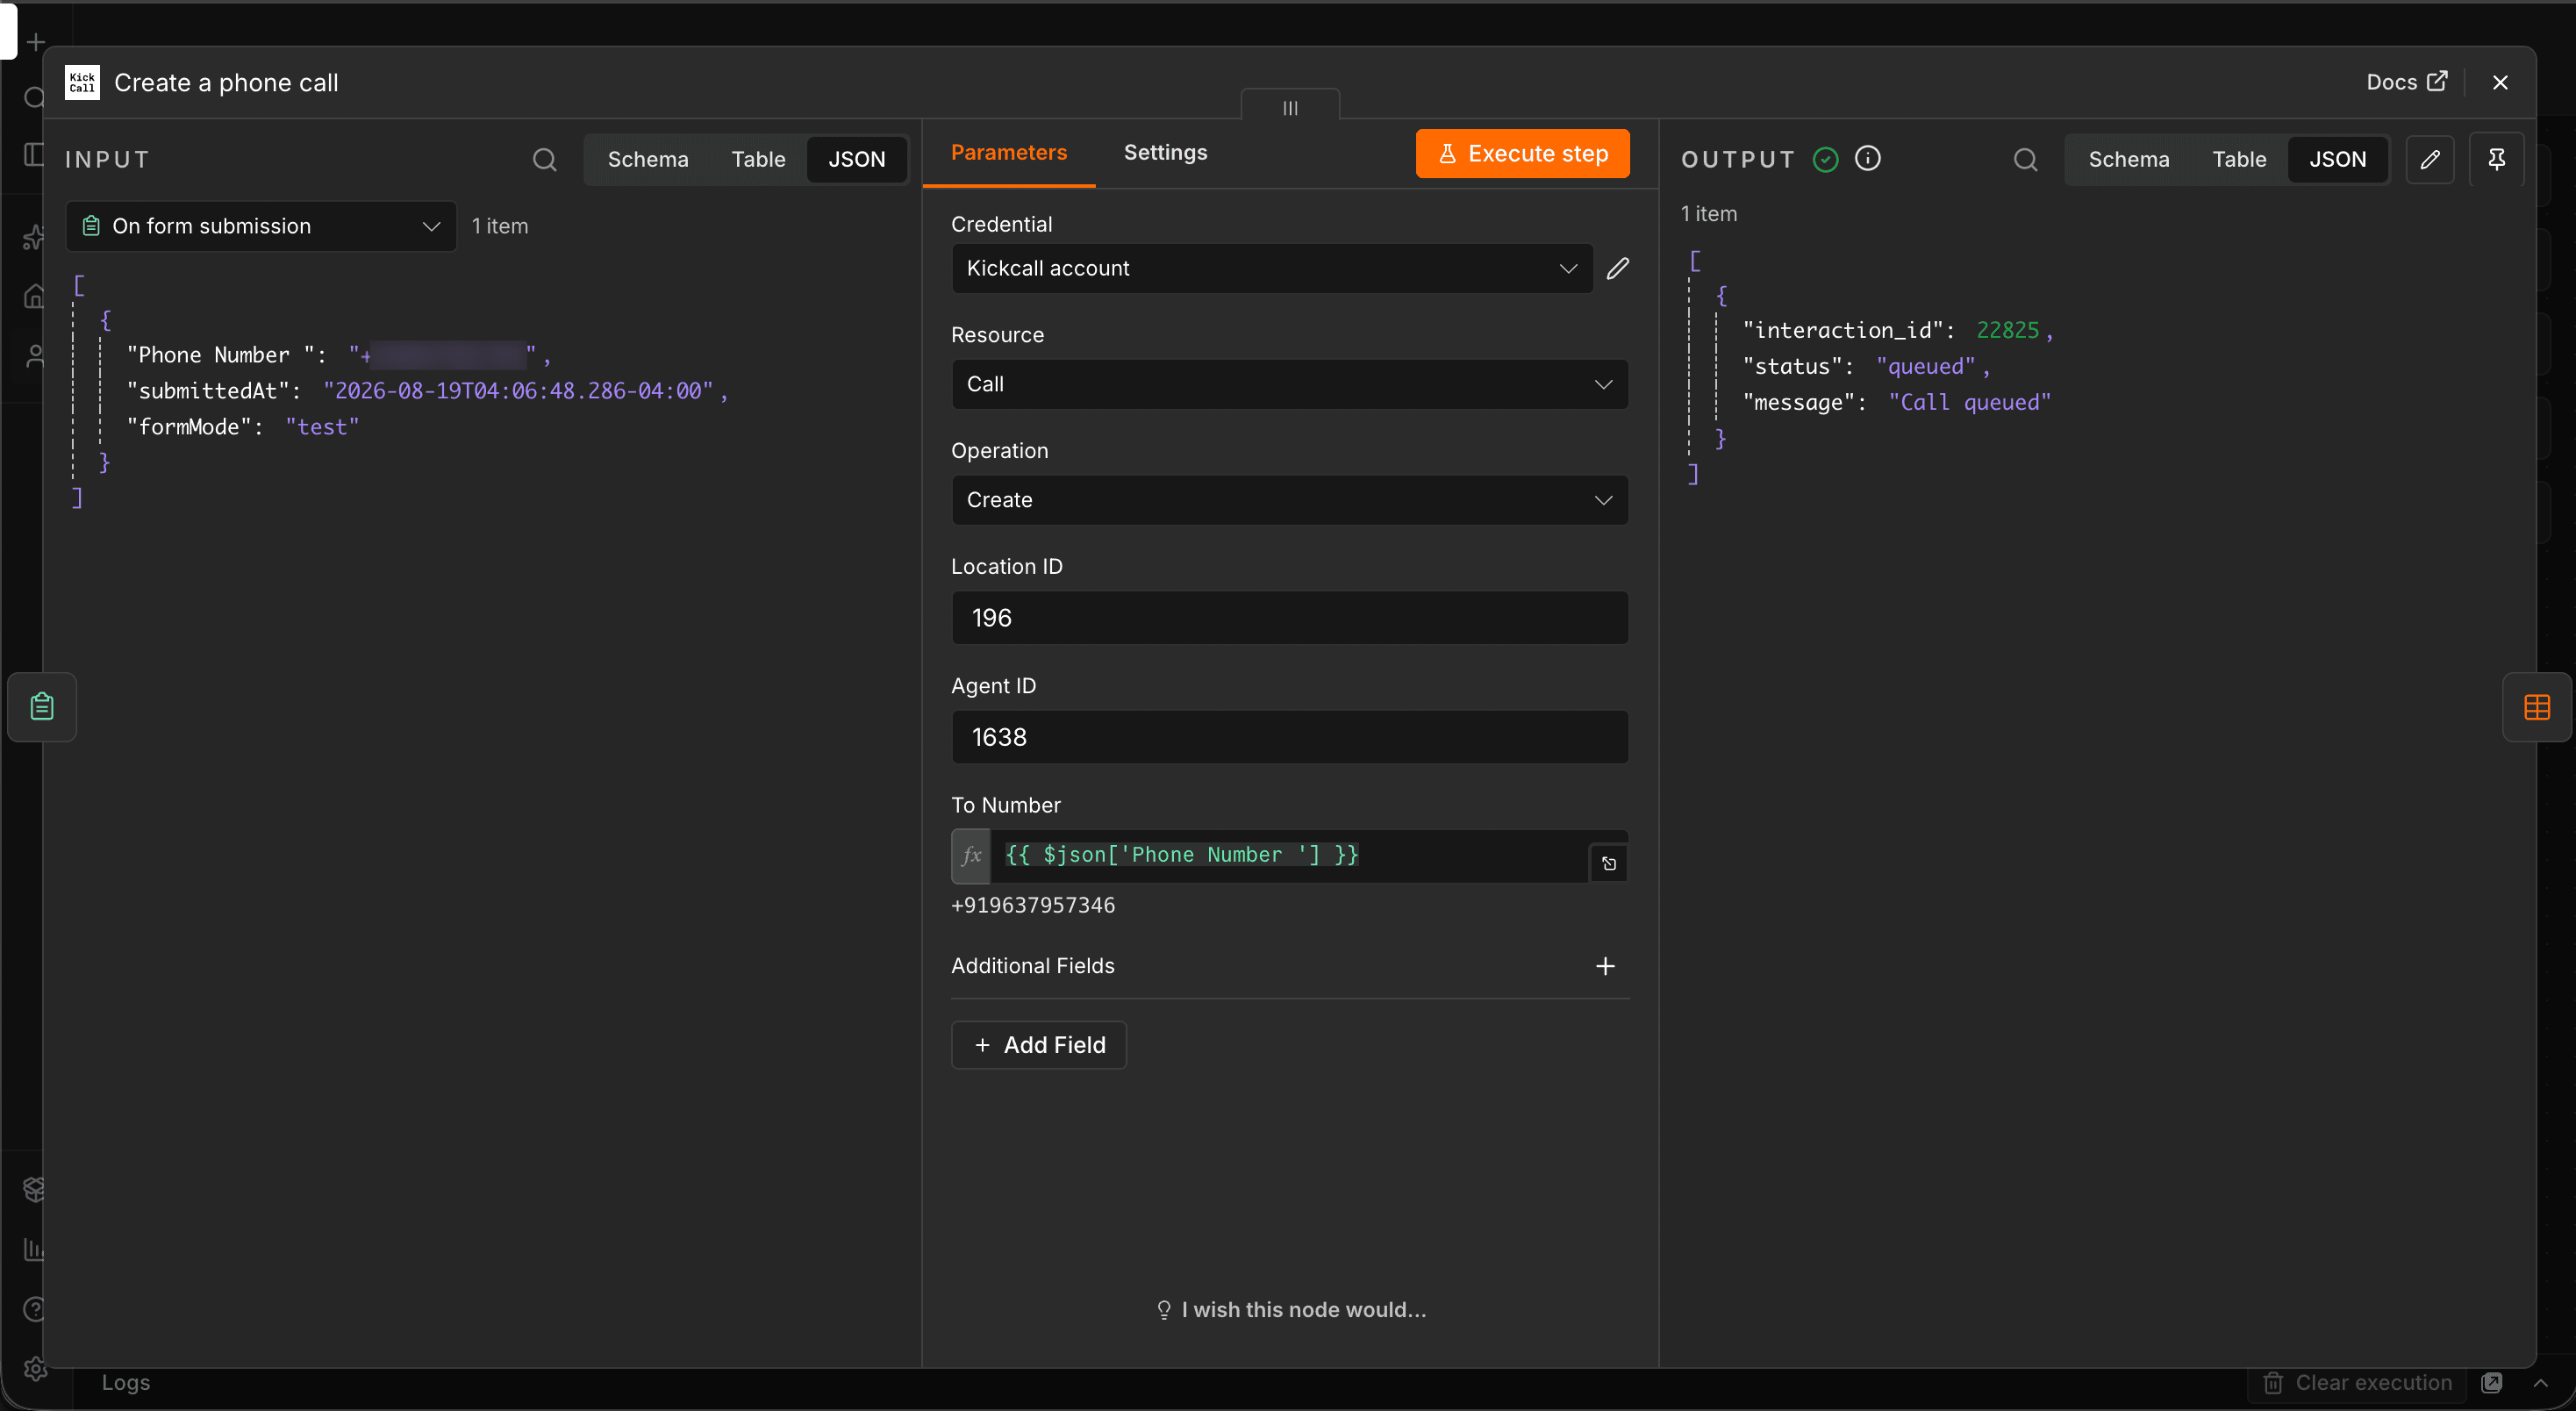
Required fields
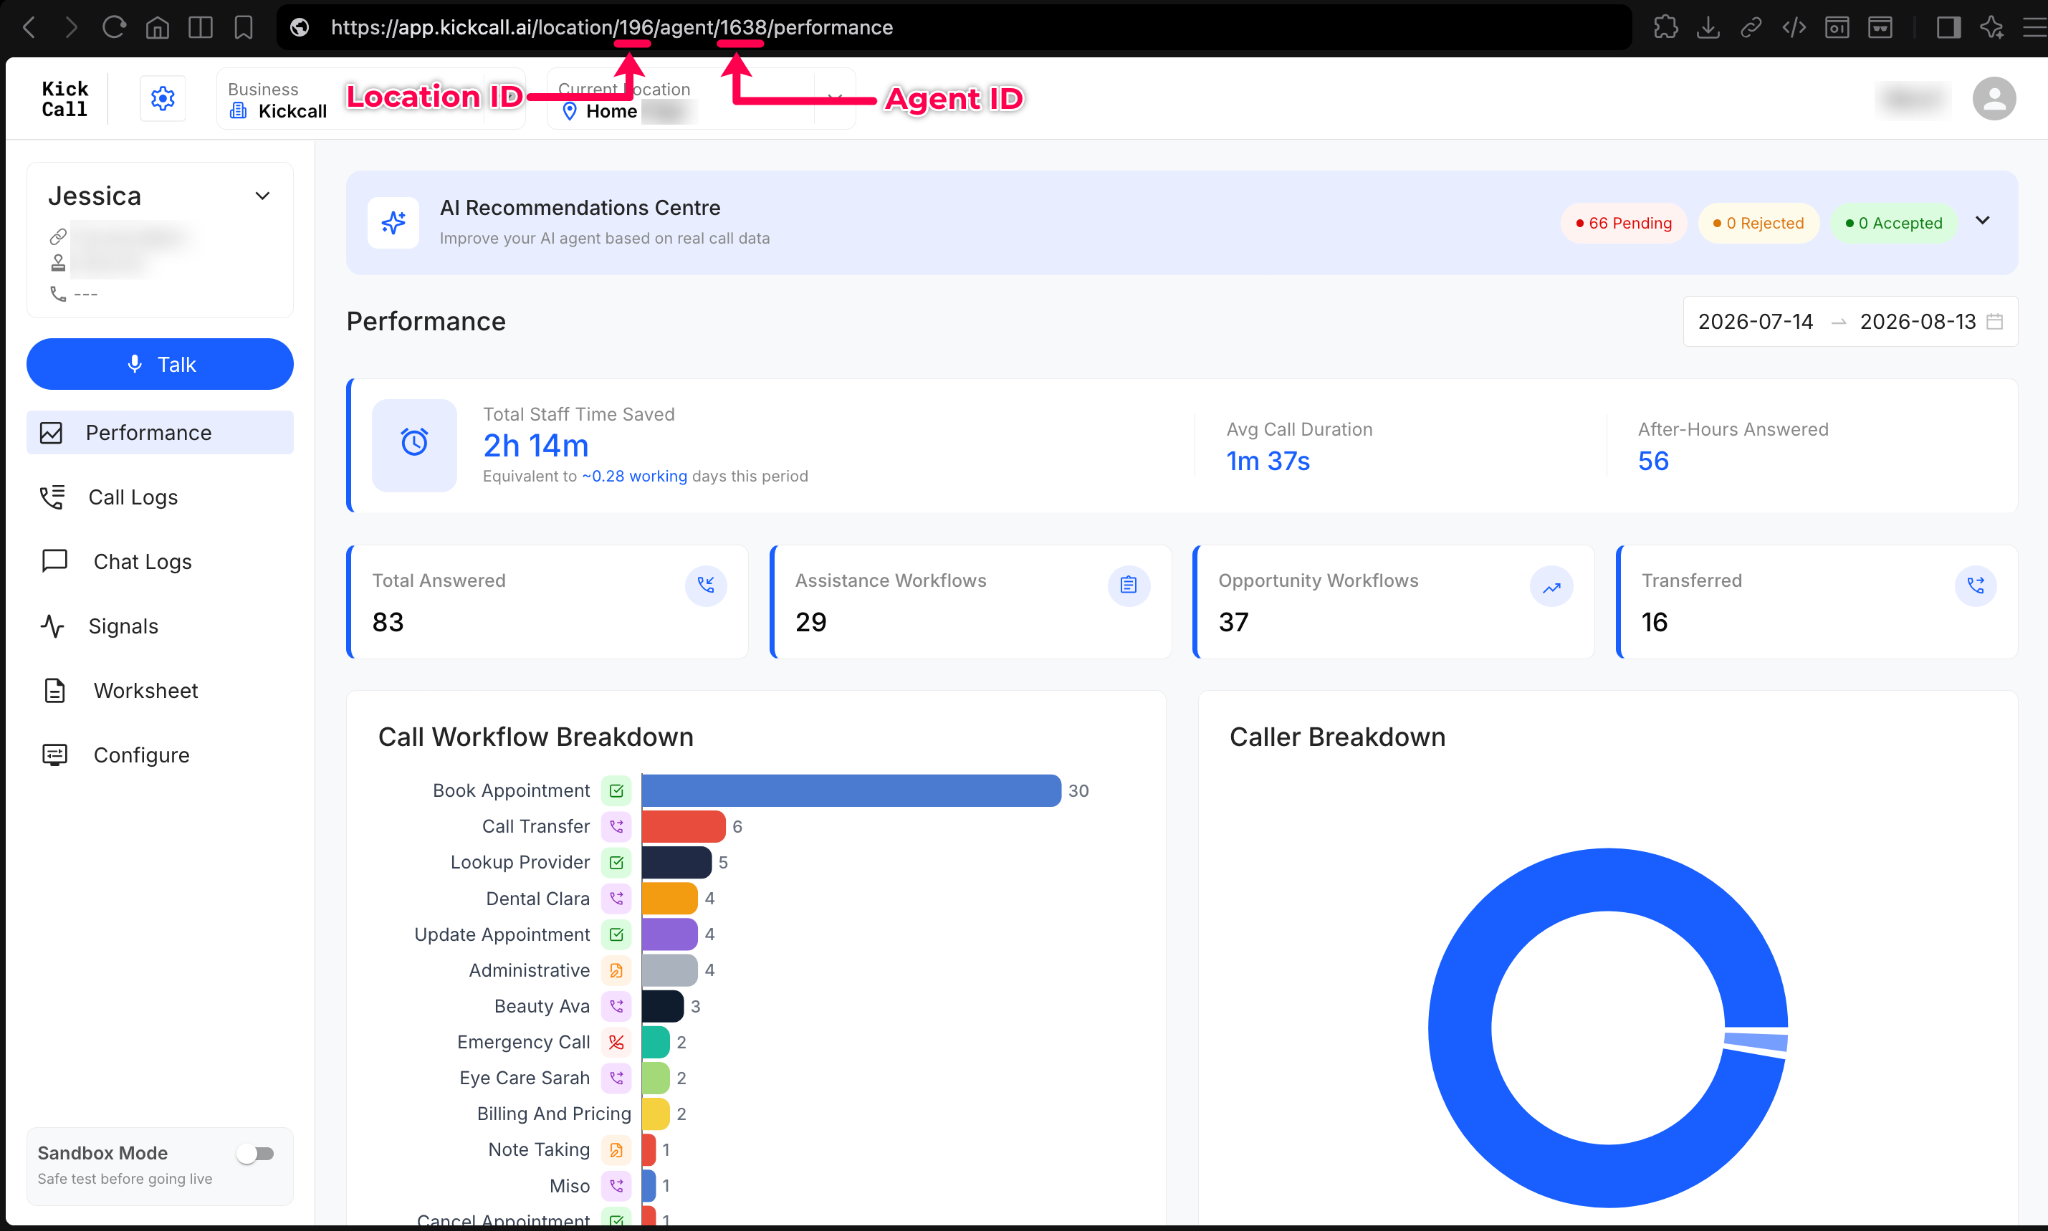
Kickcall Location ID - the Kickcall location the call should be created under. For example, 196.
Kickcall Agent ID - the Kickcall AI agent that will handle the outbound call. For example, 1638.
To Number - the phone number Kickcall should call. Map it dynamically from your trigger node, for example
{{ $json.phone_number }}.
Copy your Location ID and Agent ID straight from the URL of the agent dashboard in Kickcall.
Important: The mapped number must include a valid country code and follow E.164 international format, for example +12345678900.
Add dynamic variables (optional)
Use Kickcall LLM Dynamic Variables to pass information from n8n into the AI agent - the customer's name, appointment time, lead details or any custom CRM field the agent should know before it speaks. Supply them as raw JSON:
{ "customer_name": "{{ $json.first_name }}", "appointment_time": "{{ $json.time }}" }Add metadata (optional)
Metadata helps you identify and track a call later - useful when several workflows or campaigns create calls:
{ "source": "n8n Webhook workflow", "user_id": "{{ $json.id }}" }Step 4: Store the Interaction ID
When Create Phone Call runs successfully, Kickcall returns details about the new call, including the Interaction ID - the unique identifier for that call:
{ "interaction_id": "21204", "status": "queued" }Because n8n passes data linearly, you have two options:
Immediate processing - pass
interaction_idstraight into the next node in the same workflow.Database storage - write it to Google Sheets, Airtable or a database node alongside the contact record so a separate workflow can look it up later.
Important: Make sure the Interaction ID is stored successfully before you use it with the Get Summary action.
Step 5: Retrieve call details
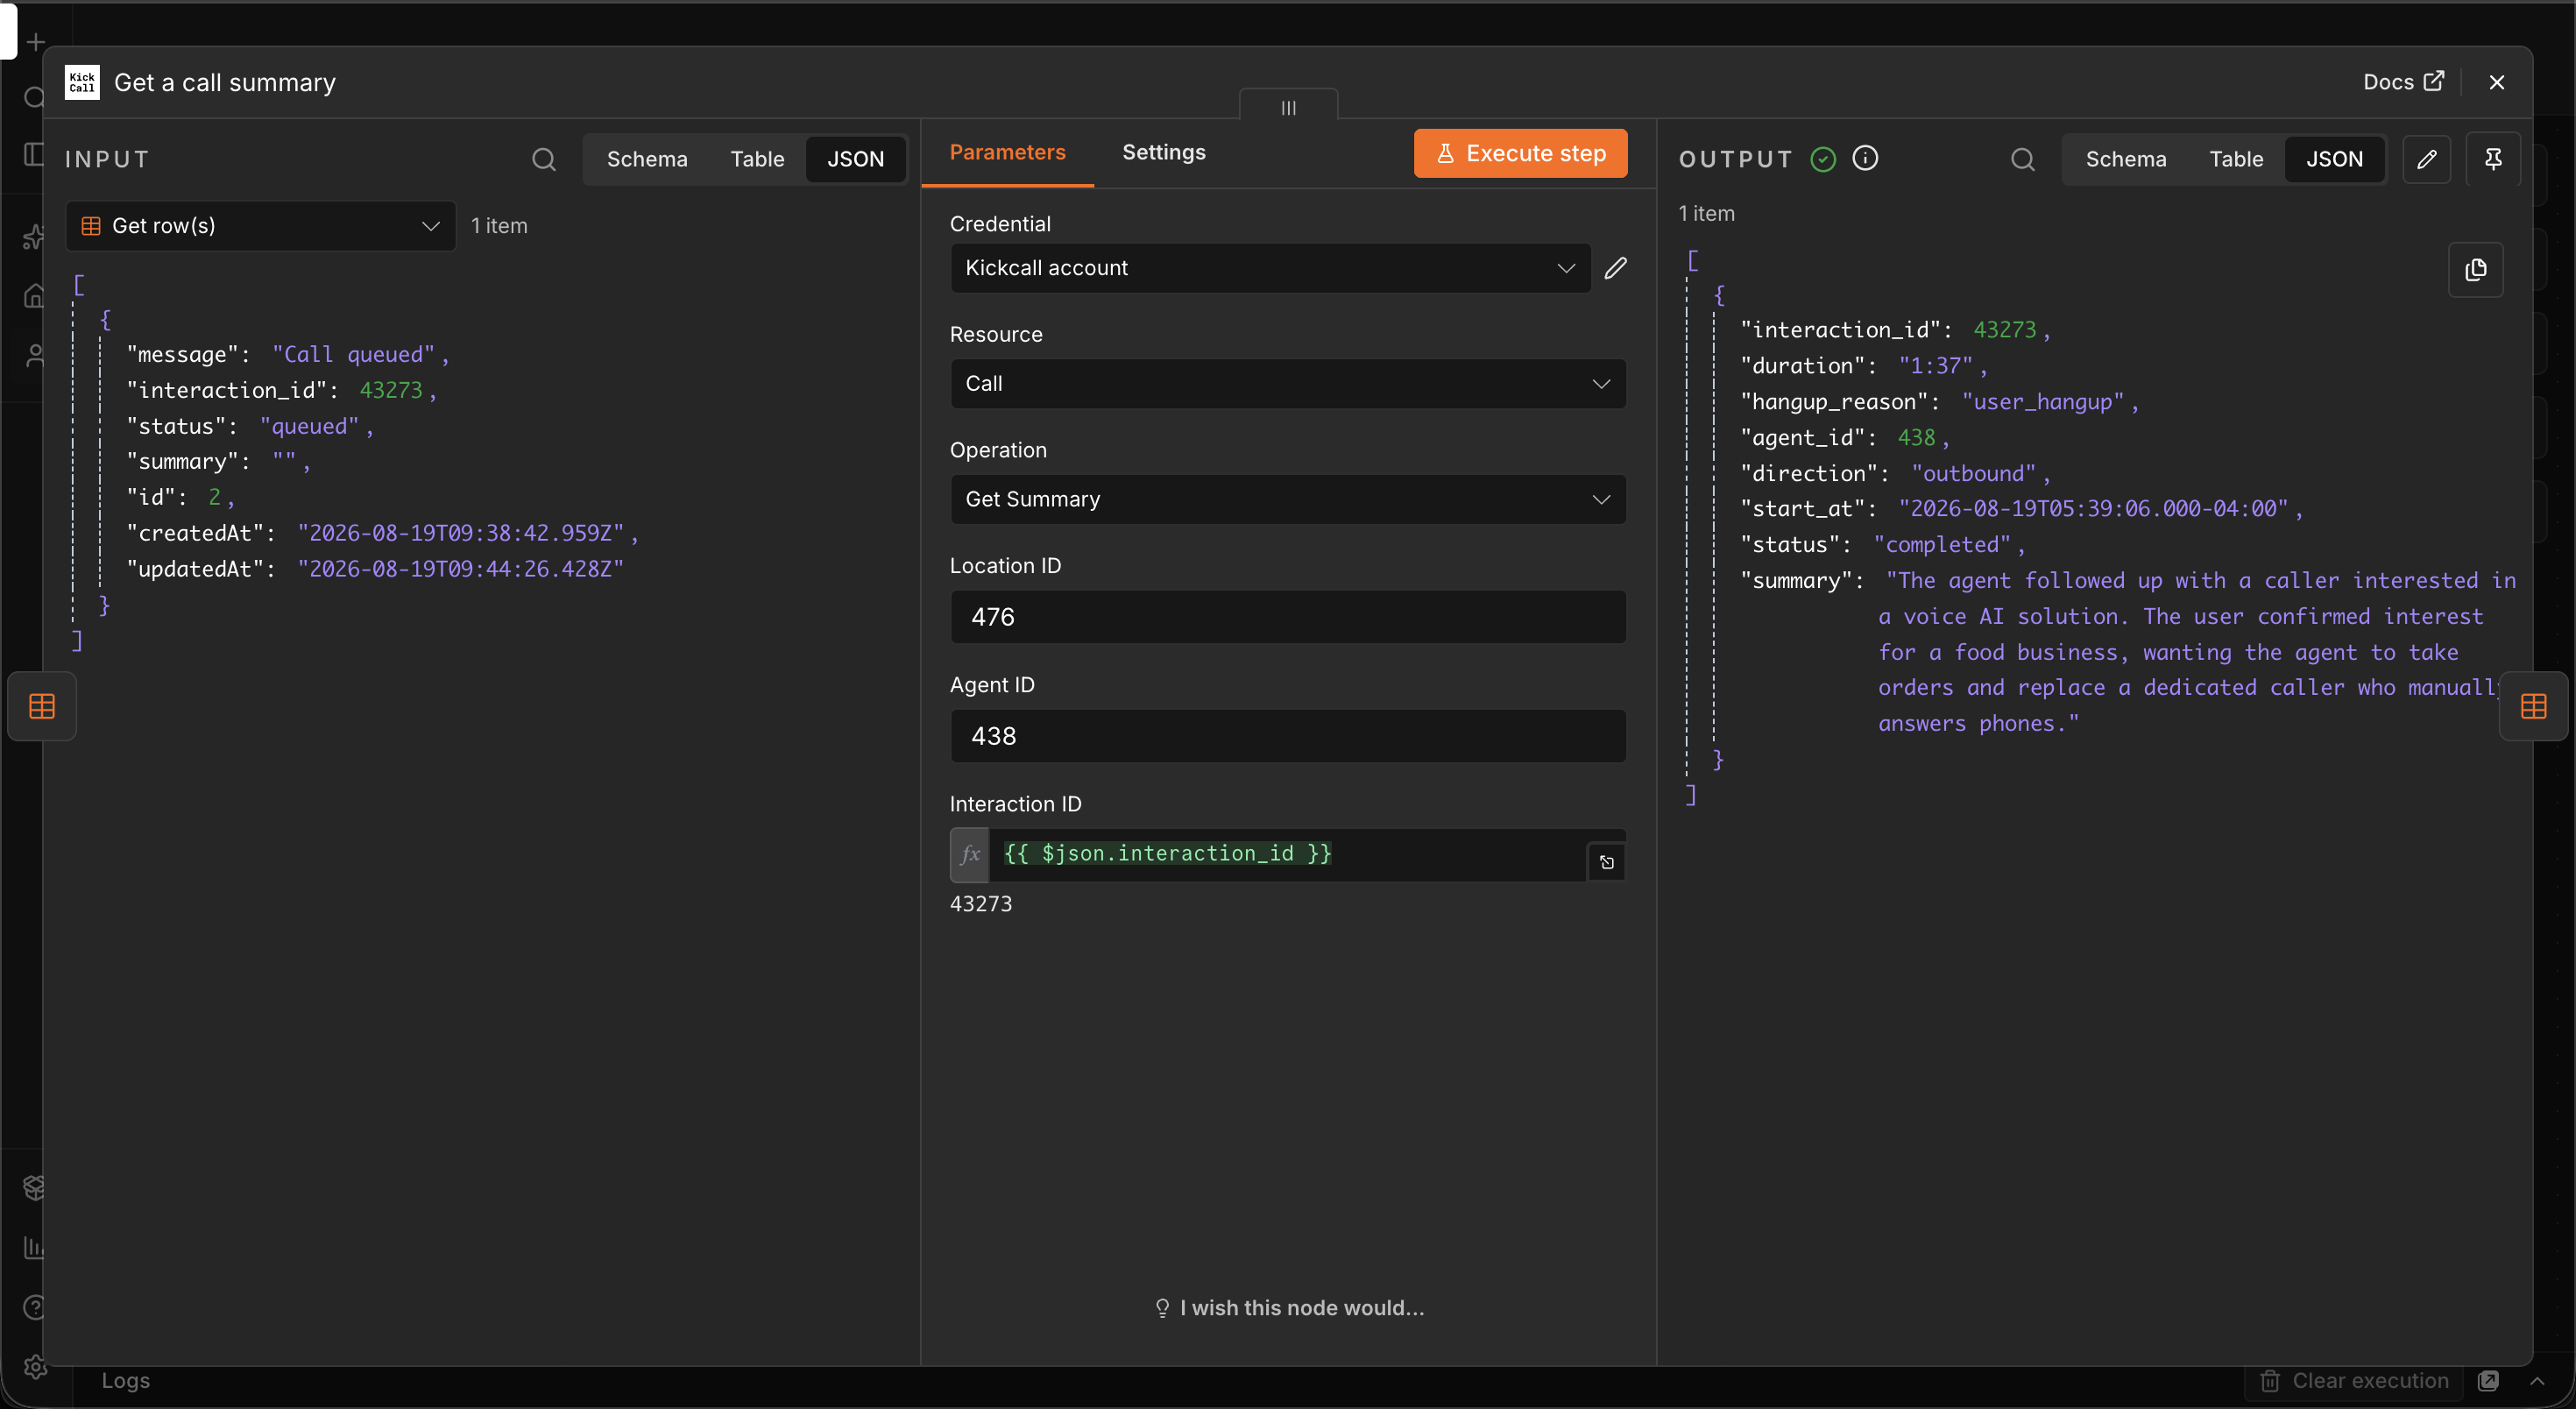
Use the Get Summary action to pull the final results of a call you created earlier, such as:
Call status
Call duration
Hangup reason
Cost
Call summary
Call recording URL
Add a node to your workflow, or create a follow-up workflow.
Search for Kickcall AI and select the Get Summary operation.
Provide the Interaction ID using an expression, for example
{{ $json.interaction_id }}.Execute the node to pull the finalised call data.
Step 6 : Build your workflow automation
Everything returned by Get Summary can feed n8n conditions and downstream actions. Route the summary into your CRM, post a Slack message recapping the call, or branch on the hangup reason to send a follow-up email or schedule a retry.
Troubleshooting
Call failed to initiate - usually an incorrect or unsupported phone number format. Confirm the number includes a valid
+country code, for example +12345678900.Authentication failed / 401 Unauthorized - the API key is invalid or expired, or the wrong Environment is selected. Generate a new key, set the Environment to Production, and update the credential.
Agent is not responding - the Agent ID is incorrect or the agent is inactive. Confirm the ID in your dashboard and make sure the agent is active.
Dynamic variables error - invalid JSON. Check for missing quotes, trailing commas or stray characters, and make sure your expressions resolve to valid strings.
404 Not Found - the credential is pointing at the Development environment. Set the Environment to Production.
If you still need help, submit a ticket to the Kickcall support team and include your Kickcall account email, your n8n version, screenshots of the workflow setup, the Interaction ID if one was generated, and the exact error message from the n8n execution log. That detail lets the team resolve the issue much faster.
Frequently Asked Questions
How do I connect Kickcall to n8n?
How do I connect Kickcall to n8n?
Open your n8n workflow canvas, search for Kickcall AI, and click on it to install. OR go to Settings > Community Nodes in your n8n instance and enter the npm package name: n8n-nodes-kickcall.
What actions does Kickcall provide in n8n?
What actions does Kickcall provide in n8n?
Two actions are available: Create Phone Call, which initiates an outbound call, and Get Call, which retrieves the details of a previously created call.
Can I trigger a Kickcall call from any n8n node?
Can I trigger a Kickcall call from any n8n node?
Yes. As long as you can map a valid phone number into the node, you can trigger it from Webhooks, CRMs, databases or schedule triggers.
What is the Interaction ID?
What is the Interaction ID?
It is the unique identifier for a Kickcall call. It is returned when the call is created and is what Get Summary uses to look the call up.
Why should I save the Interaction ID?
Why should I save the Interaction ID?
Saving it — in the next node or in a sheet or database — lets a later step, or an entirely separate workflow, retrieve the call details with Get Summary.
Can I pass information to the Kickcall AI agent?
Can I pass information to the Kickcall AI agent?
Yes. Use the Kickcall LLM Dynamic Variables field to send JSON data mapped from earlier n8n nodes to the agent before the call starts.
What is metadata used for?
What is metadata used for?
Metadata tags the call with your own reference values, such as the source workflow or a user ID, so you can track which automation created which interaction.
What phone number format should I use?
What phone number format should I use?
E.164 international format with a valid country code, for example +12345678900.
Where do I find my Location ID and Agent ID?
Where do I find my Location ID and Agent ID?
Both appear in the URL when you open the agent inside your Kickcall dashboard. Copy them from there into the node configuration. See here
Was this helpful?
Still need help? Ask the team