Business Integrations — Activate Credentials & Sync Data
Written By Anand Raj
Last updated 4 months ago
The Integrations module is where a Kickcall Business activates the third-party tools (EHR, scheduling, CRM, etc.) that its AI agent will use during live calls. Before the agent can read or write anything in the third-party system, the integration must be made active with valid credentials, and (if supported) the records must be synced into Kickcall.
This article walks through both steps: activating an integration with credentials, and running the initial data sync.
Step 1 — Activate the integration with credentials
Every integration the Agency has assigned to your Business shows up under Integrations. Open one and you'll land on the Credentials tab.
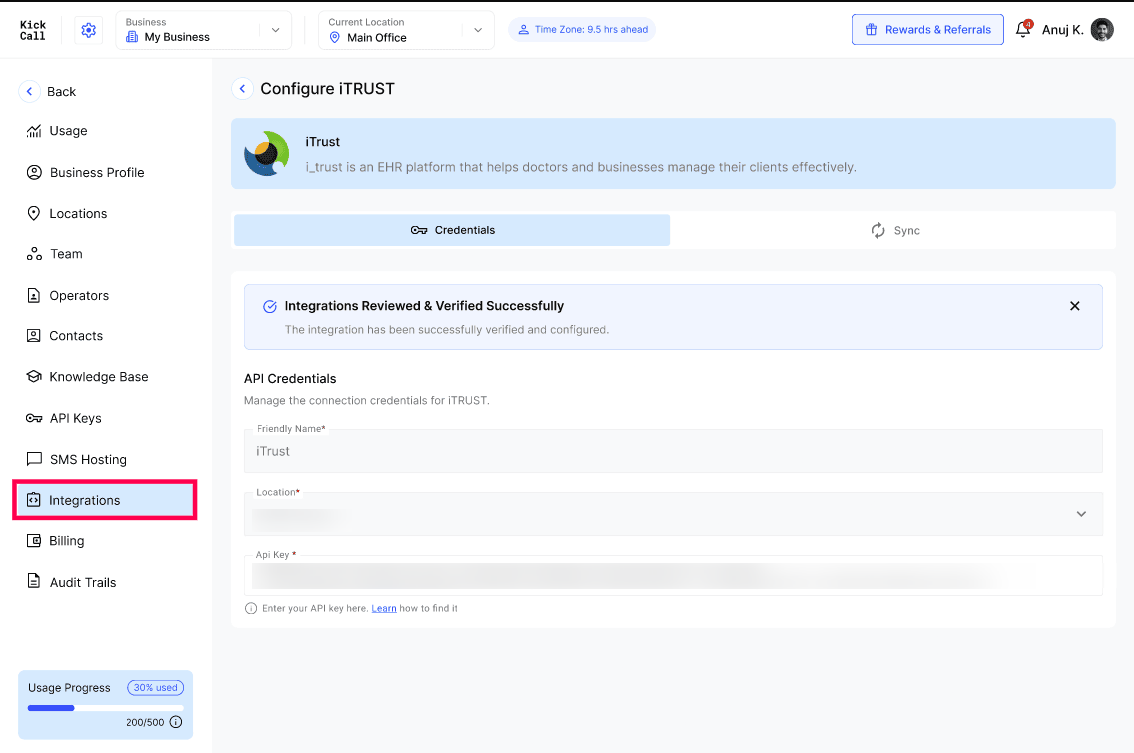
To activate, fill in:
Friendly Name — a label so you can identify this connection (useful when the same integration is connected for multiple locations).
Location — the Business location this connection belongs to.
API Key (or OAuth, depending on the integration) — the credential issued by the third-party platform.
Every integration has its own activation requirements. The exact fields you'll see on the Credentials tab depend on what the third-party platform requires — some common examples:
API Key / API Username + Password / Base URL — most EHR and practice management integrations.
OAuth login — for integrations that support it, you'll be redirected to sign in to the third-party platform and grant access.
Tenant / Business / Branch IDs — some integrations need additional identifiers alongside the key.
Click Edit (top-right of the API Credentials card) to enter or update the values, then save. Once Kickcall validates the credentials, the integration becomes active and the Sync tab (if supported) unlocks.
For integration-specific setup steps and documentation, reach out to your Agency. Each integration has its own process for issuing API keys, OAuth access, or required IDs — and the wrong values will silently fail. Your Agency support team maintains the per-integration documentation and will either provision the credentials for you or walk you through requesting them from the third-party vendor.
Step 2 — Sync data from the integration into Kickcall (if supported)
If your integration supports data sync, you'll see a Sync tab next to Credentials. Sync pulls existing records (contacts, patients, customer profiles, etc.) from the third-party platform into Kickcall so the agent can reference them on calls.
Note: Sync does not copy appointment or slot availability data into Kickcall. Appointments and open slots are always fetched at runtime, live from the integration during a call — so your agent always sees the latest schedule without waiting for the next sync.
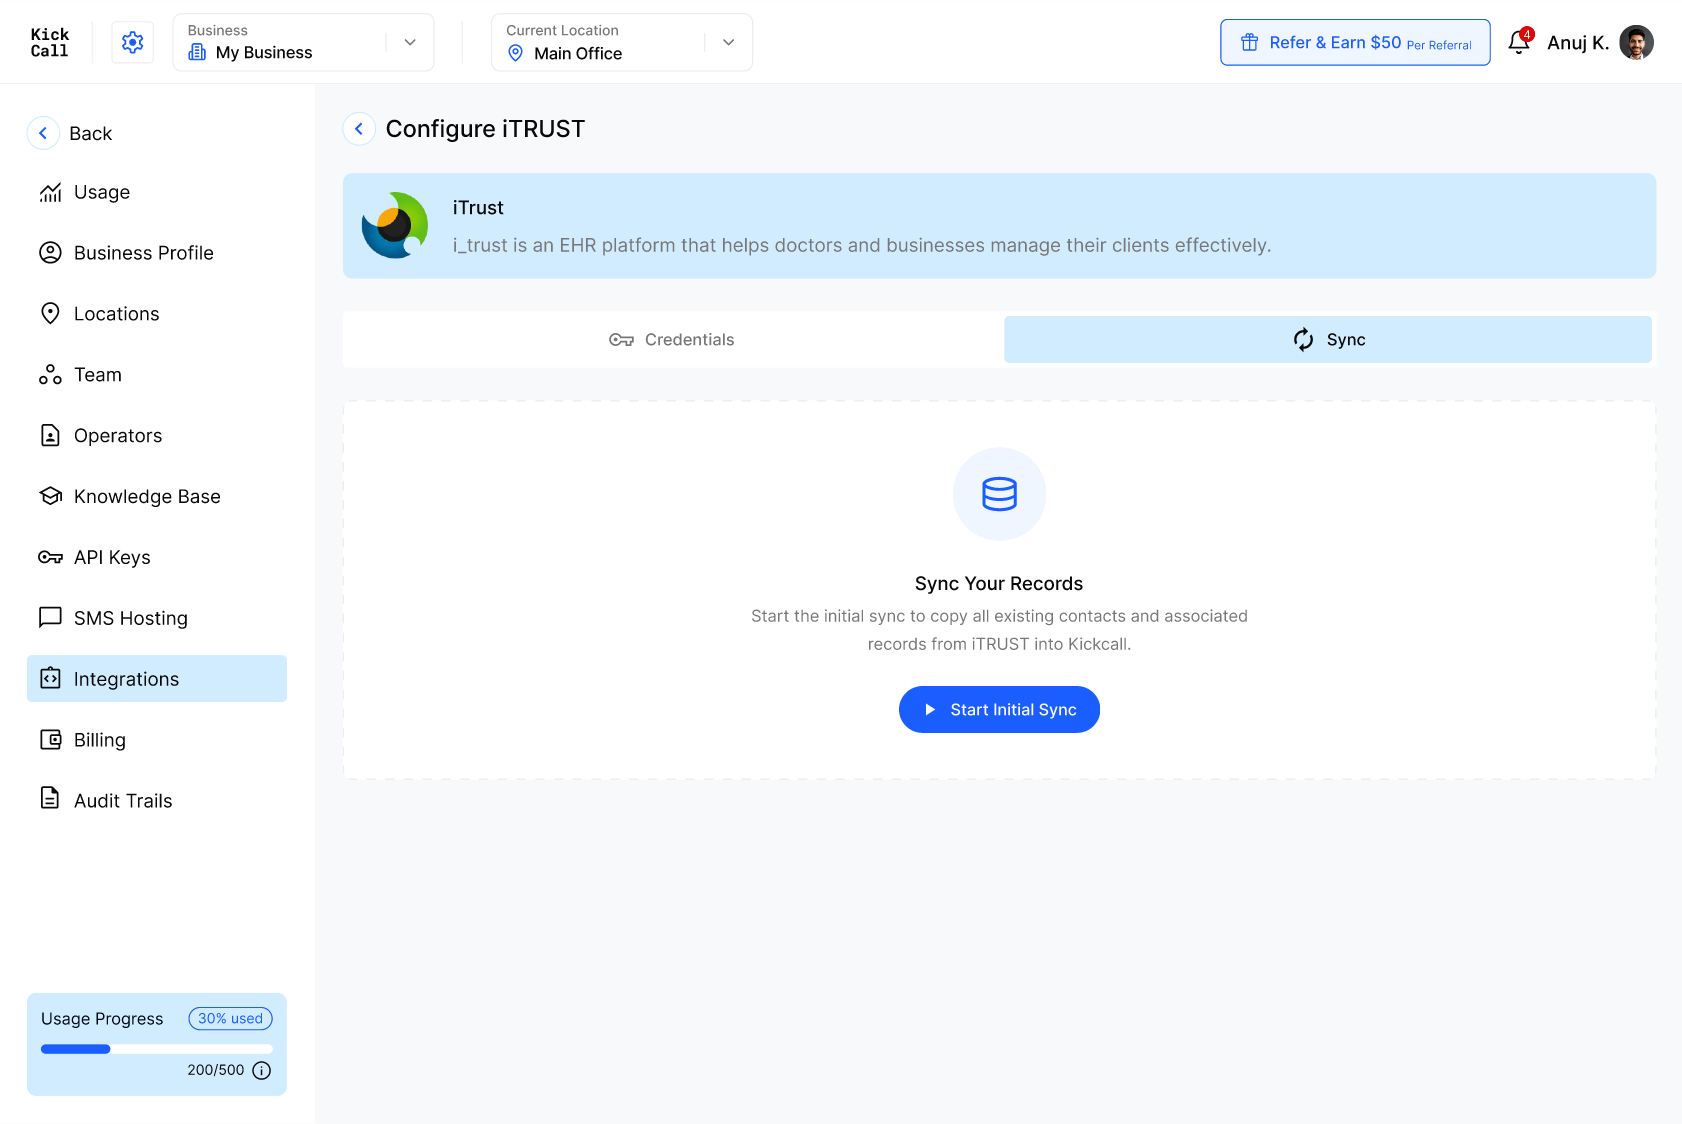
Run the initial sync
The very first sync must be started manually using the Start Initial Sync button. This copies every existing record from the integration into Kickcall.
Important: The initial sync can take time — how long depends on the size of your database in the third-party system. A few hundred records will finish quickly; tens of thousands can take a while. Recommendations:
Run it during non-working hours — so it doesn't compete with live calls or staff using the third-party system.
Have your Agency team initiate it — they can monitor it end-to-end and intervene if something fails.
Sync Now, Sync Schedule, and Sync Logs
After the initial sync, the Sync tab shows three things:
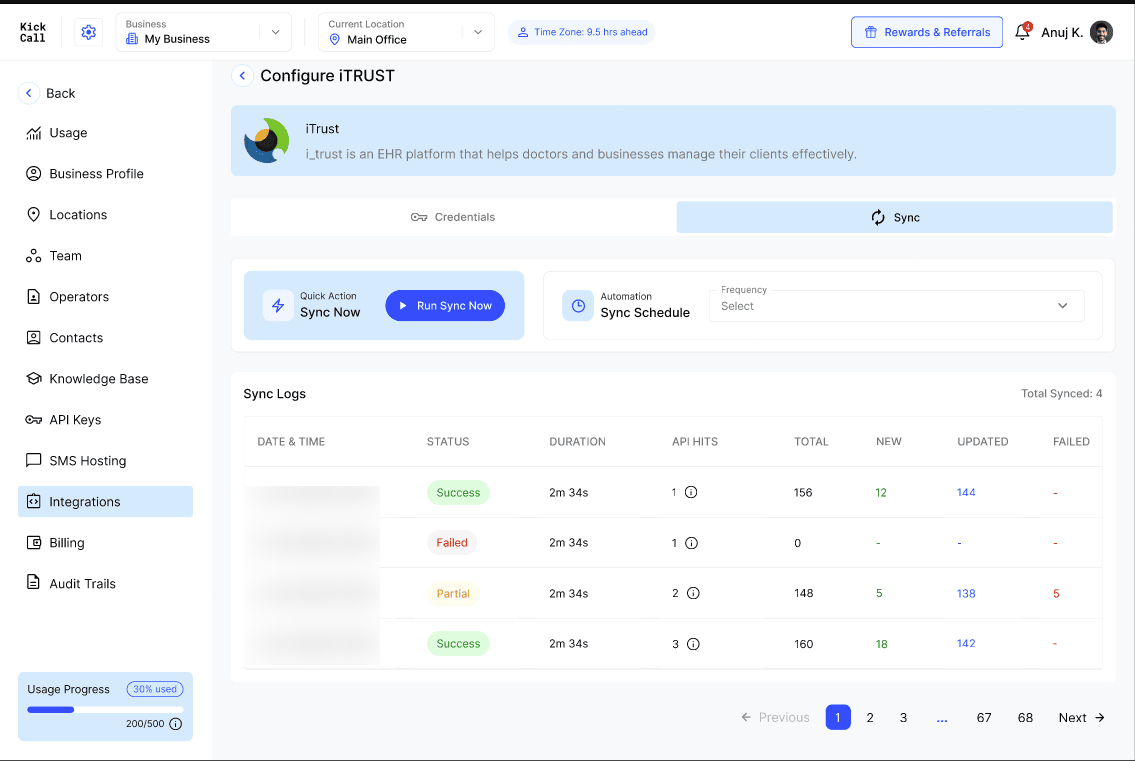
Sync Now — a manual Run Sync Now button to trigger an on-demand sync any time (for example, after you've just added a batch of records in the third-party system and want them available to the agent immediately).
Sync Schedule — set the automation Frequency so Kickcall keeps records in sync without manual action. Daily is the recommended cadence for most Businesses — it keeps records fresh without putting unnecessary load on the third-party API.
Sync Logs — a per-run history with Date & Time, Status (Success / Partial / Failed), Duration, API Hits, and counts for Total, New, Updated and Failed records. Use this to verify each sync run and to spot integrations that need attention.
Reading the sync statuses
Success — all records in the run were processed without errors.
Partial — some records were synced successfully and some failed (see the Failed column). Usually caused by individual records with missing/invalid fields in the third-party system.
Failed — the whole run failed, typically due to expired credentials, revoked OAuth access, or the third-party API being down. Re-check the Credentials tab first.
Frequently Asked Questions
How do I activate a Business integration?
How do I activate a Business integration?
Open Integrations, pick the Business integration the Agency has assigned to you, go to the Credentials tab, click Edit, fill in the Friendly Name, Location and the API Key (or complete the OAuth flow) for that integration. Save — once the credentials are validated, the Business integration becomes active and (if supported) the Sync tab unlocks.
What credential types are supported when activating a Business integration?
What credential types are supported when activating a Business integration?
It depends on the specific Business integration. The most common are API Key, API Username + Password + Base URL, and OAuth sign-in. Some Business integrations also require additional identifiers like a Business ID, Tenant ID, or Branch ID. The Credentials tab only shows the fields that this particular Business integration needs.
I don't know how to get the API key or OAuth credentials for my Business integration — what should I do?
I don't know how to get the API key or OAuth credentials for my Business integration — what should I do?
Every Business integration has its own activation requirements and setup documentation. Reach out to your Agency for the per-integration credential guide. They'll either provision the credentials for you or walk you through requesting them from the third-party vendor. Don't guess — wrong values will silently fail the Business integration activation.
Does the Business integration sync pull appointments and open slots?
Does the Business integration sync pull appointments and open slots?
No. The Business integration sync does not copy appointment or slot availability data. Appointments and open slots are always fetched live at runtime from the Business integration while the agent is on a call, so your agent always sees the most current schedule — independent of the sync cadence.
Why is the Sync tab not visible for my Business integration?
Why is the Sync tab not visible for my Business integration?
Not every Business integration supports data sync. The Sync tab only appears for Business integrations that pull records (contacts, patients, customer profiles, etc.). If you don't see it, your Business integration is action-only — the agent calls the third-party API live during a conversation and no data is copied in.
How long does the first Business integration sync take?
How long does the first Business integration sync take?
The first Business integration sync time depends on the size of your database in the third-party system. A few hundred records finish in minutes; tens of thousands of records can take significantly longer. Run the initial Business integration sync during non-working hours and let your Agency team initiate it so they can monitor it end-to-end.
How do I run the first sync for a Business integration?
How do I run the first sync for a Business integration?
Open the Sync tab on the Business integration and click Start Initial Sync. This is a one-time manual action that copies all existing records from the third-party platform. We recommend running it during non-working hours and ideally letting your Agency team initiate it so they can monitor it end-to-end.
Can I run a Business integration sync on demand after the initial sync?
Can I run a Business integration sync on demand after the initial sync?
Yes. After the initial Business integration sync, the Sync tab shows a Sync Now card with a Run Sync Now button. Use it any time you've made bulk changes in the third-party system and want them reflected immediately, without waiting for the next scheduled Business integration sync.
What sync frequency should I choose for my Business integration?
What sync frequency should I choose for my Business integration?
Daily is the recommended cadence for most Business integrations. It keeps records fresh enough for the agent without putting unnecessary load on the third-party API. Use Run Sync Now in between if you make a large batch change in the Business integration that can't wait for the next daily run.
How do I automate Business integration syncs?
How do I automate Business integration syncs?
Use the Sync Schedule card on the Business integration's Sync tab to set the Frequency — Daily is recommended. The Business integration sync will then run automatically on that cadence so your agent always has up-to-date records.
What do Success, Partial and Failed mean in the Business integration Sync Logs?
What do Success, Partial and Failed mean in the Business integration Sync Logs?
Success — every record in the Business integration sync run was processed. Partial — some records synced and some failed (see the Failed column); usually caused by individual records with missing or invalid data in the third-party system. Failed — the whole Business integration sync run failed, typically due to expired credentials, revoked OAuth access, or the third-party API being down. Check the Credentials tab first.
What do the New, Updated and Failed columns mean in the Business integration Sync Logs?
What do the New, Updated and Failed columns mean in the Business integration Sync Logs?
New = records created during this Business integration sync run. Updated = existing records modified to match changes in the third-party system. Failed = records that couldn't be synced in this run — open the row details to see why.
My Business integration sync keeps failing — what should I check first?
My Business integration sync keeps failing — what should I check first?
Start with the Credentials tab on the Business integration. The most common cause is expired API keys, rotated passwords, or a revoked OAuth session. Re-enter the credentials and try Run Sync Now. If it still fails, contact your Agency support team with the failed run's Date & Time from the Business integration Sync Logs.
Was this helpful?
Still need help? Ask the team